Posted by Wayne Parham [ 65.69.120.224 ] on May 25, 2005 at 19:43:20:
In Reply to: ProFet Buildup - Opening the box posted by Wayne Parham on May 24, 2005 at 15:15:02:
The ProFet amplifier kit is straightforward to build. Except one problem: I don't read French. Good thing Eric's English is perfect, and he made an English version of the instruction manual for me. Eric says Selectronic will be making an updated manual very soon.
I was eager to build this amp because I was impressed with it at GPAF. It really surprised me, to tell the truth. Eric tells me that it was originally designed with biamplification in mind, to act as a high frequency amp when used with a Selectronic active crossover. A more powerful amp could be used for the low frequencies.
But when you're dealing with high efficiency speakers and horns, you can pretty much shift the power levels required by a decimal point, making a 15 watt bass amp and a 2 watt treble amp viable possibilities. And many people will enjoy it as a standalone wideband amplifier, as I did at GPAF a few weeks ago. It's perfect for any high efficiency loudspeaker.
After opening the box and laying out the components, the first thing to do is assemble the amplifier modules. They are the smallest part of the amp, with the power supply taking up most of the room. Each amplifier module is a 2.375" x 1.5" PCB. Pretty clever the way it's laid out too - The mounting standoffs serve as power connectors too.
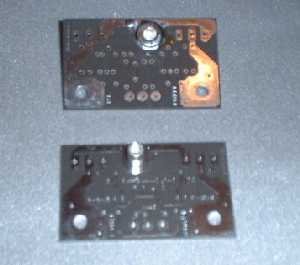 Middle standoff soldered in place | 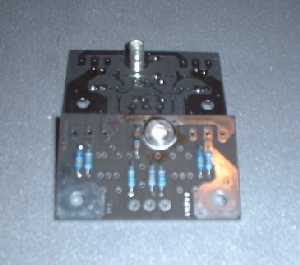 Resistors mounted |
The standoff is a pretty big chunk of metal, so at first, you'll think it will be tough to heat with your soldering iron. But it isn't bad at all with a 35 watt heater. Touch the tip to the standoff for maybe 2 seconds, and the solder flows onto it like melted butter. It just takes a little bit and you're through. Next, mount all the resistors on the circuit board as shown in the component layout shown below:

There are only eight resistors to mount, so it doesn't take long to solder 'em all. If you're quick with your color codes, you'll have it done in a hurry. But Selectronic doesn't use those 10% resistors with three bands and a tolerance band, these babies are the close tolerance ones with five and six bands. So you'll have to brush up on the color codes and that will take you a bit longer.
Here's a cheat sheet:
15Ω - brown, green, black, gold, brown
287Ω - red, grey, violet, black, brown, red
332Ω - orange, orange, red, black, brown
499Ω - yellow, white, white, black, brown
1kΩ - brown, black, black, brown, brown
After mounting the resistors, find a 100pF mica capacitor and a couple 0.22uF caps. Mount those next. Then find the 220Ω trimmer resistors and the TO-92 JFETs, the 2SJ74 and 2SK170. But don't take the JFETs out of their anti-static bags until you're ready to solder them in place.
 Capacitors installed | 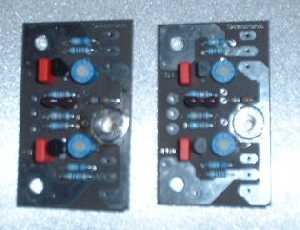 Trimmers and JFETs installed |
When these are assembled at the factory, special ESD precautions are observed. People that handle FET and MOS components wear ground strap wristbands and assembly benches are grounded, as are soldering irons and any other equipment that may come in contact with the devices or circuit boards. When production levels are high, robotic assembly lines and wave solder machines are used, and everything is grounded and carefully controlled to ensure no electrostatic discharge might damage the MOS and FET devices before they are safely installed.
So now your task is to take a few steps to ensure that you protect these static sensitive devices also. For the most part, you can make do with what you have, unless you don't have a grounded tip soldering iron. If you don't have one, step up to the plate and get one. In a pinch, I've wrapped a piece of wire around the base of an ungrounded iron and connected the other end to earth ground before. But a good soldering iron is less than a hundred bucks, so I suggest that you get one if you don't have one already.
You can also get a grounding strap and put it on your wrist. They don't cost much, and will ensure that you remain static free. Without one, you will tend to "float" electrically, and even after you touch ground, just walk across the carpet and you can be charged with 1000 volts or more. When you get a shock on a cool, dry winter day, the arc of static electricity that jumps from your finger to a doorknob is as much as 50,000 or more, believe it or not. So a high impedance device with breakdown voltage of 100 volts doesn't stand a chance.
But you can get by without these things if you are careful. Lay a piece of aluminum foil on your workbench, and set the circuit board on it. Set the sealed bag with the field effect transistors on the foil. This way, the circuit board and transistors are at the same electrical potential. Before opening the bag with the transistors, touch the aluminum foil for a second or two, to discharge yourself. Open the bag with it still in contact with the foil, and take out the components you need. Try to maintain contact with the foil so that you, the circuit board and the transistor are all in contact with one another. Insert the transistors, paying attention to their direction and remember that there are two different TO-92 transistors in each board. Touch the tip of your iron to one of the large power lands on the PCB to ensure the PCB is at the same potential as the grounded tip, and hold the tip to this pad for one second, or maybe a second and a half. Then move over to the transistor and solder it in place.
All that just to make a few solder joints. But it's worth it - By taking these steps, you've made sure you didn't puncture the substrate with what would be the equivalent of an enormous lightning bolt. When the transistors are soldered onto the circuit board, they are safer because they are protected by the other components on the board. The circuit provides a conductive path around the transistor. I still wouldn't recommend doing things that might generate static electricity around it, but it is safer when soldered on the circuit board.
[ Selectronic Forum ] [ Help ]