Posted by Wayne Parham [ 65.69.120.224 ] on June 03, 2005 at 17:12:44:
In Reply to: Re: ProFet Buildup - 2nd Hour posted by Wayne Parham on May 28, 2005 at 14:24:17:
The next thing to do is build the input boards. They are simple little boards, and don't take long to assemble at all. All that's on the boards are the balanced and unbalanced input connectors, a switch, an integrated circuit and two capacitors. The beauty in having this board is that the input signal is buffered right away, immediately upon entering the chassis. This helps reduce noise and keep the signal clean.
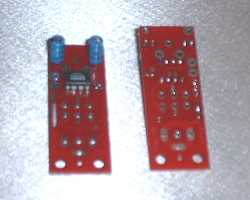 Input board with Burr Brown op amp and caps |  Completed input board with connectors |
Now it's time to install the power transformer. Using two nuts, put the four threaded rods on the transformer mounting plate. Leave 1/2" extra length from the mounting plate to the end of the threaded rod. Then install a nut on each of the threaded rods, and insert the tranformer onto the circuit board. The nuts will act as a stop and maintain spacing so that the transformer is suspended above the power supply PCB. The mounting plate should be 2" from the printed circuit board. Don't tighten it up yet, because it's easier to solder the wires from the secondary with the transformer loose.
Threaded studs on mounting plate | Secondary connections |
Solder the secondary wires as shown above, and then mount the transformer. The wires are physically located on the transformer in the same order as are soldered onto the PCB: blue, yellow, red, black, white, white, blue, yellow, red, black. They're very easy to identify, but double check that you've connected them right.
After the secondary is connected, solder the primary connections in place. At this point, it may be easiest to start the mounting nuts, but leaving them loose. That way, the transformer can't accidentally come loose and break the wires. But with it still loose, you can move the transformer up a little bit to make soldering access easier. The primary wires connect to the PCB holes nearest the blue MOV in this order: white, blue, blue, white. Again, they're easy to identify but double check your connections. Once the primary wires are soldered, tighten the transformer mounting nuts.
Transformer installed | 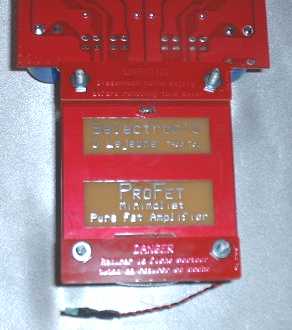 Warning labels on transformer mounts |
After the transformer is mounted, use a bit of flux remover to clean the power supply board and input boards. Then mount the warning label boards on the transformer mounting studs on the PCB side as shown above.
[ Selectronic Forum ] [ Help ]