|
Home » Sponsored » Pi Speakers » Build Thread: 2Pi Towers, 6Pi Corner horns (and possibly a sub and center) (Building some Pi Speakers)
| Re: Build Thread: 2Pi Towers, 6Pi Corner horns (and possibly a sub and center) [message #88434 is a reply to message #88057] |
Sat, 14 July 2018 13:10   |
 joshua43214
Messages: 35
Registered: October 2016
Location: USA
|
Baron |
|
|
Hello everyone, please accept my apologies for the long delay on continuing this thread.
Along the way to finishing the project several things happened that took away my time on one hand, and took the wind out of my sails on the other. I continued to have issues with the paint, I will go into detail later, but I found it extremely hard to continue to muster enthusiasm for a project I was already getting tired of knowing that I was going to have real issues with the final finish in the end. My experience with the 3Pi Subwoofer only put me off more (more later).
On a more positive note, I was able to sneak a nice trip to the Painted Rocks area of the Upper Peninsula, and took a horizontal transfer where I work. I have the same title and description, but I am taking over a brand new lab and all that entails. The new position also came with a nice pay raise, and very real opportunity for further advancement. I don't recall if I mentioned it already, but I hold degrees in Molecular Genetics and Mathematics, and work in a semi-academic research capacity. The down side is a lot of hours until I can get everything working as it should, and by then we will have 2 post-docs I will have to nurse along 
Also, if you could hear my 6Pi Cornerhorns, I am sure you would also prefer to relax and enjoy the music rather than write a build thread...
That said...
We interrupt this 6Pi build thread to knock out a 3Pi Subwoofer...
The 3Pi Subwoofer is truly a weekend project, and is quite a simple build. If you are looking for a good project to get your feet wet, this, or the 1Pi speakers are an excellent choice.
After a brief email exchange with Wayne over what plate amp to chose, I settled on the Dayton Audio SPA250 from Parts Express. The Eminence JOB12 that the Pi3 Sub is built around is a serious beast, and I was worried about pairing a 250W amp with a 400W driver. There is a huge price jump when you cross the 250W threshold, and I did not want to spend a ton of money on an amp whose primary purpose will be LFE (the 6Pi's do not need a sub). I suppose I should be clear that Wayne did not utter even a breath of approval for this particular amp, he just assured me that the wattage would be more than adequate. Those of you have sought Wayne's advice on anything not sold by Pi Speakers will know that getting him to voice an opinion is like trying to pull teeth from a rooster (for good reason imo).
I still took the time to model the sub in Fusion 360, which saved me from a major issue. The port tube runs nearly the entire depth of the enclosure, and it would have hit the plate amp. I had to move the plate to the upper half of the back to avoid this.
I used "as built" construction for the entire project, and only a handful of critical dimensions are cut before assembly. The 3Pi Sub is really big which makes cutting square edges a bit of a challenge.
When I cut the parts for the 6Pi bass bin, I made a special square to use as a router guide to cut all the parts to identical length, I repurposed this square for squaring up the baffle and rear panel. I know I have not yet written that part of the 6Pi build, I will hopefully get it posted before too long. It is not a complicated thing, just some scrap MDF glued together with 2 edges parallel and both square to a third edge.
I had the store I purchased the MDF from rough cut the parts - the 3Pi Sub needs almost an entire sheet of MDF. I laminated the baffle the same way already described for the 2Pi's. I took extra care to make sure I did not put the clamping screws where it would cause havoc with any of the cut outs. After the baffle dried, I cut two edges parallel on the baffle, the back, and both sides using the table saw. I then cut one edge square on only the baffle and the back with the above mentioned jig. I then cut the last edge by putting the freshly cut squared edge to the rip fence that had been left undisturbed from cutting the edges parallel. The remaining edges on the sides are left rough cut.
A word of caution here. Rip fences are for ripping, and this last cut is a cross cut. Cross cutting with a table saw is extremely dangerous. The parts are large enough, and the baffle heavy enough to mitigate some of the danger though. Unless you have had enough things go sideways on the table saw so that you know what to avoid, I suggest taking the extra time to trim the last edge with a router or circular saw.
Once the baffle and back where cut, I used the all the same methods to cut the driver and port holes as above. I used a jig saw to cut the plate amp hole.
I then glued up the baffle, back, sides, and bottom in one go. I just used my eyes and fingers to get all the overhangs even. There is no need for super accuracy here. A box this size will have to be very out of square before it is noticeable, and it will have no effect on the sound at all.
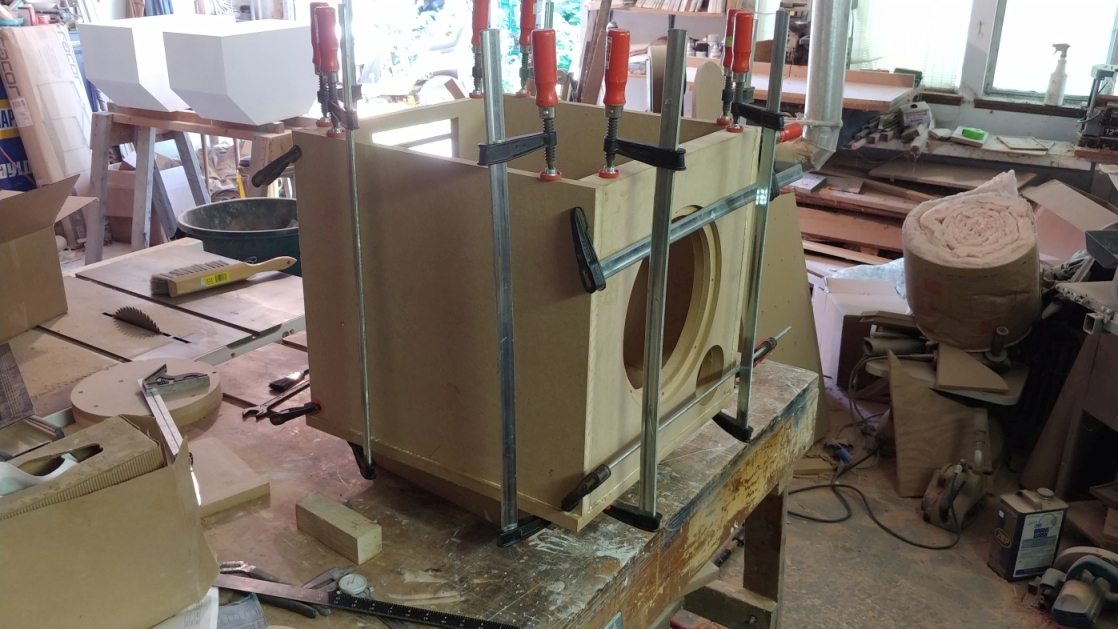
After 45 minutes, I removed the clamps, cut 2 pieces of scrap to support the port tube, and used epoxy to glue the tube into place.
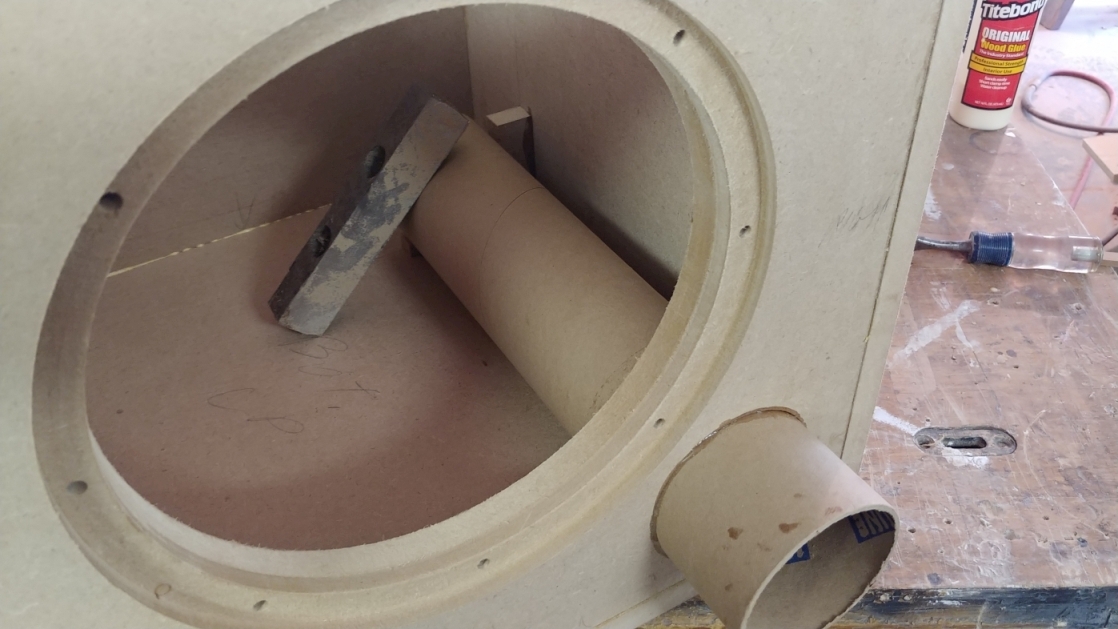
Note the piece of steel scrap used a weight to "clamp" the port to the braces.
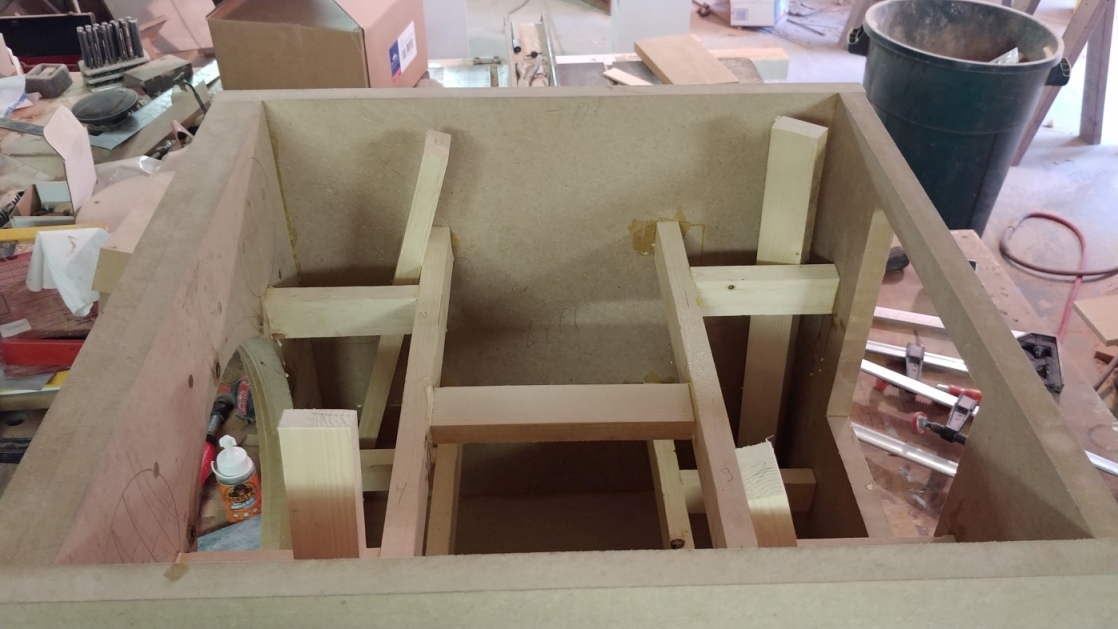
I then cut 1x2 pieces to size as braces. All of these are spring fit, and require no clamping. To get the short piece that spans the middle in, I used clamps to flex the longer cross braces back so I could fit the shorter brace in without scrapping off all the glue.
I then glued the top on and left it to dry overnight.
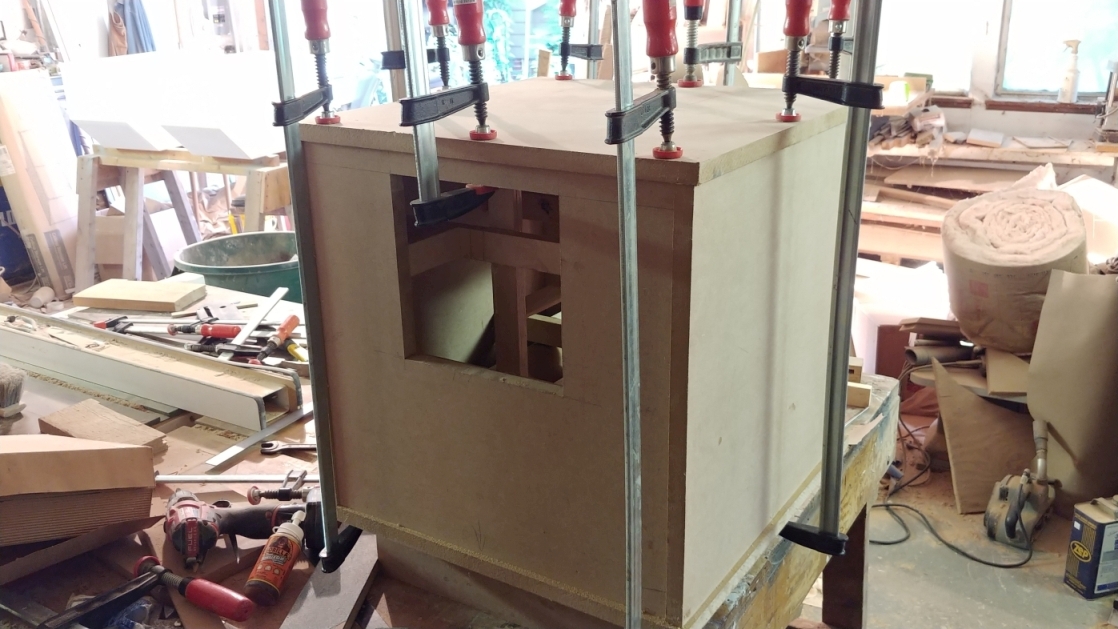
The next day, I used a handsaw to trim the port tube back, and flushed all the edges with a router. At this point I just moved the sub into the house and put it into service.
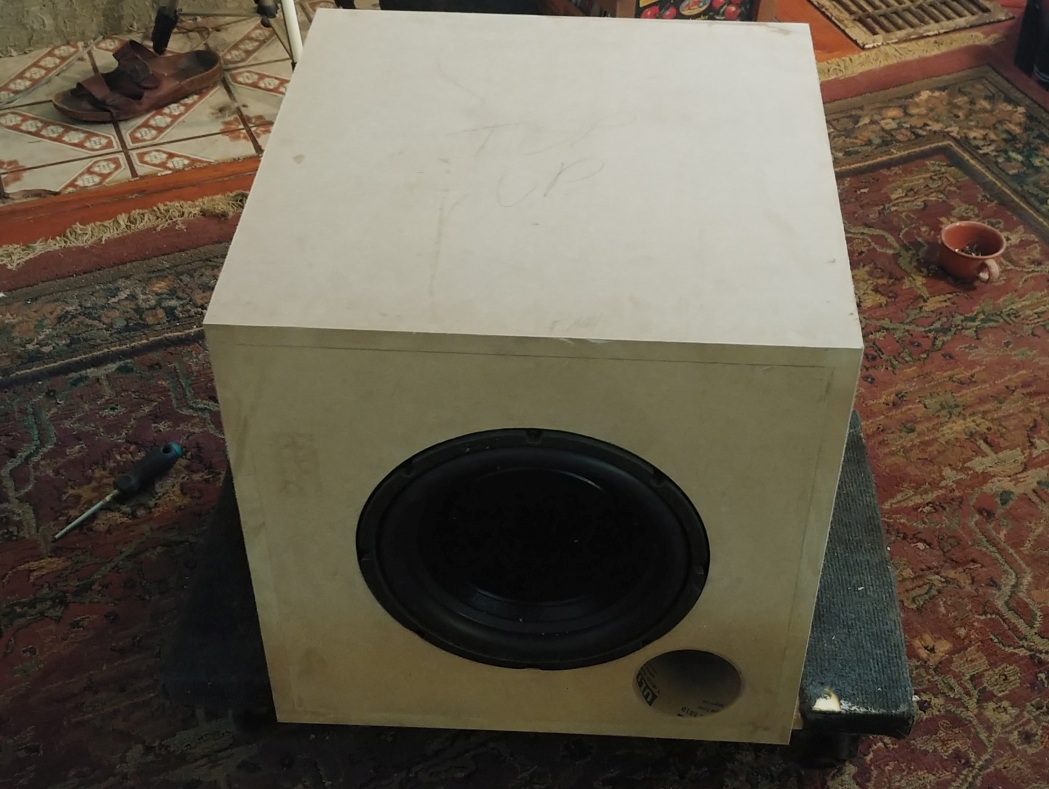
Note the mechanics creeper it is sitting on. This thing is heavy enough to hurt your back, and moving it around is not fun. I wanted it up front with the 2Pi Towers until the 6Pi's are done when I plan to move it behind the couch.
My plan at this point was still to remove the 2Pi's for another coat of paint after the 6Pi's where done. Painting the sub now would mean I could not generate dust in the shop during the process. So it seemed best to bring it in and enjoy it while waiting for the 6Pi's to be completed.
I am not sure how to review this sub, since it is being driven by an inexpensive Dayton Audio amp. I did find I had to turn the gain down til it was almost off before it would match up with the 2Pi Towers, and I wound up low-passing it at about 120Hz. It will operate above that frequency, but it produced some distortion that I attribute to the amp. Once it was set up though, wow...
Angels descended and shed white light upon my listening room. All was good and Josh was happy until the amp packed up after less than 10 days and started making funny noises all its own. I have trouble describing how frustrated I was about this. I put the kind person from Parts Express on speaker phone, and he agreed to do an RMA right way. At this time, I am still waiting for the replacement. What little enthusiasm I had to play with MDF in my spare time only to have paint issues rapidly diminished. A camping trip with my wonderful (and at this point suffering) girl friend was in order to restore my perspective.
Wayne highly recommends pairing his first four Pi box speakers with flanking subs. I can't speak for the 3Pi or 4Pi, but it does truly miraculous things to the 2Pi Tower, which sounds very respectable all on its own. if you are debating the addition of a sub, do it. The 3Pi Subwoofer does things for cello and piano that is nothing short of amazing, not to mention drums and deep vocals. My only issue is the size, two of them side by side would be bigger than my already too big coffee table.
Up next, the continuing saga of the 6Pi Cornerhorns.
-Josh
|
|
|
|
 |
|
Build Thread: 2Pi Towers, 6Pi Corner horns (and possibly a sub and center)
|
|
|
Re: Build Thread: 2Pi Towers, 6Pi Corner horns (and possibly a sub and center)
|
|
|
Re: Build Thread: 2Pi Towers, 6Pi Corner horns (and possibly a sub and center)
|
|
|
Re: Build Thread: 2Pi Towers, 6Pi Corner horns (and possibly a sub and center)
|
|
|
Re: Build Thread: 2Pi Towers, 6Pi Corner horns (and possibly a sub and center)
|
|
|
Re: Build Thread: 2Pi Towers, 6Pi Corner horns (and possibly a sub and center)
|
|
|
Re: Build Thread: 2Pi Towers, 6Pi Corner horns (and possibly a sub and center)
|
|
|
Re: Build Thread: 2Pi Towers, 6Pi Corner horns (and possibly a sub and center)
|
|
|
Re: Build Thread: 2Pi Towers, 6Pi Corner horns (and possibly a sub and center)
|
|
|
Re: Build Thread: 2Pi Towers, 6Pi Corner horns (and possibly a sub and center)
|
|
|
Re: Build Thread: 2Pi Towers, 6Pi Corner horns (and possibly a sub and center)
|
|
|
Re: Build Thread: 2Pi Towers, 6Pi Corner horns (and possibly a sub and center)
|
|
|
Re: Build Thread: 2Pi Towers, 6Pi Corner horns (and possibly a sub and center)
|
|
|
Re: Build Thread: 2Pi Towers, 6Pi Corner horns (and possibly a sub and center)
|
|
|
Re: Build Thread: 2Pi Towers, 6Pi Corner horns (and possibly a sub and center)
|
|
|
Re: Build Thread: 2Pi Towers, 6Pi Corner horns (and possibly a sub and center)
|
|
|
Re: Build Thread: 2Pi Towers, 6Pi Corner horns (and possibly a sub and center)
|
|
|
Re: Build Thread: 2Pi Towers, 6Pi Corner horns (and possibly a sub and center)
|
|
|
Re: Build Thread: 2Pi Towers, 6Pi Corner horns (and possibly a sub and center)
|
|
|
Re: Build Thread: 2Pi Towers, 6Pi Corner horns (and possibly a sub and center)
|
|
|
Re: Build Thread: 2Pi Towers, 6Pi Corner horns (and possibly a sub and center)
|
|
|
Re: Build Thread: 2Pi Towers, 6Pi Corner horns (and possibly a sub and center)
|
|
|
Re: Build Thread: 2Pi Towers, 6Pi Corner horns (and possibly a sub and center)
|
|
|
Re: Build Thread: 2Pi Towers, 6Pi Corner horns (and possibly a sub and center)
|
|
|
Re: Build Thread: 2Pi Towers, 6Pi Corner horns (and possibly a sub and center)
|
|
|
Re: Build Thread: 2Pi Towers, 6Pi Corner horns (and possibly a sub and center)
|
|
|
Re: Build Thread: 2Pi Towers, 6Pi Corner horns (and possibly a sub and center)
|
Goto Forum:
Current Time: Sun Apr 28 09:37:47 CDT 2024
|


 Posting Rules
 Members
 Search
 Help
Help Register
 Login
Login Get a T-Shirt!


")

