|
Home » Sponsored » Pi Speakers » Build Thread: 2Pi Towers, 6Pi Corner horns (and possibly a sub and center) (Building some Pi Speakers)
| Re: Build Thread: 2Pi Towers, 6Pi Corner horns (and possibly a sub and center) [message #88170 is a reply to message #88057] |
Tue, 12 June 2018 22:14   |
 joshua43214
Messages: 35
Registered: October 2016
Location: USA
|
Baron |
|
|
As I write this post, the replacement drivers have arrived safe and sound, and I am still waiting on the replacement cross-overs and my 3Pi Subwoofer parts. All the major construction of the 6Pi is complete, and only a handful of small parts need to be made, and some holes drilled. I have begun painting what is ready to be painted, and I expect to spend the next week or two on painting the rest. I aggravated my back injury lifting the bass bins last Thursday, so I have been working at a slower pace since then. I have also begun work on the 3Pi Subwoofer, but can't proceed until the kit arrives. I will prolly interrupt the 6Pi build with a post or two on its construction at some point.
The vast majority of this portion of the thread will be given over to the midhorns. The Tweeter boxes and bass bins are fairly straight forward, and do not require much additional to the 2Pi Towers. This forum limits the number of images you can upload for each post, so this will also be broken up into many posts since I have many pics.
During one of my previous lives, I was a furniture maker. During this time, I spent a few years making percussion instruments. I have probably tried about every method possible for cutting and gluing tapered joints. I know from experience how difficult it can be to get a proper glue joint on something like this. Proper glue joints depend on two things: surface area, and clamping pressure. It takes very little error in the cut angle to reduce the amount of surface area below the required amount, and it is almost impossible to clamp perpendicular to the joint. I consider the horn section of this build to be a somewhat advanced project, that should be doable by anyone with moderate experience in woodworking. Mostly it requires patience and fussiness at a few key points, as well as the proper tools.
The method I used is one of the methods I worked out for making tapered drums, and it works extremely well. I decided not to make a full sized jig because it would have taken most of a day to construct and cost over $50.00 to make. If I had to do it over again, I would make the jig. The time and hassle saved would have been well worth it. A properly designed jig would allow not only the flare parts to be cut accurately, it would also act as a clamp for gluing, and allow the horn box to be fitted over the flare with no hand fitting. The design and construction of a jig like this is actually more complicated than the design and construction of the entire 6Pi, if your inclination is toward this type of work, I suggest you follow your inclination.
Wayne sells flat packs for the horn flare.
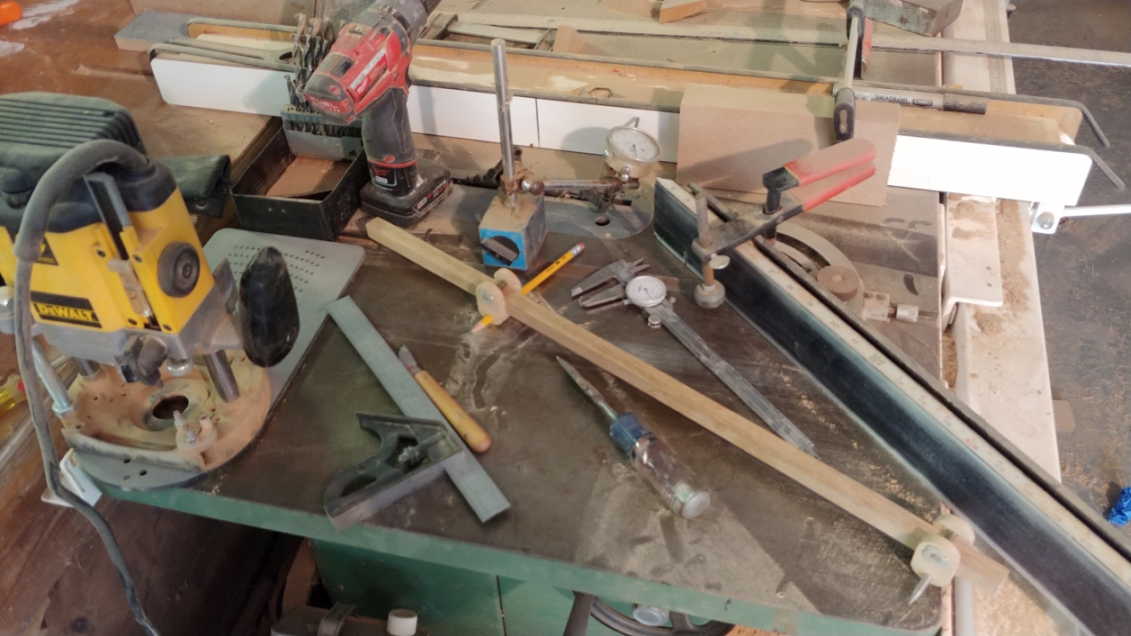
Tooling:
If you are cringing at the idea of buying tools just for this project, consider that the 6Pi costs $2700.00 + freight unfinished. Even if you spend several hundred dollars on tools, you are still coming out way ahead.
I would not even consider attempting the flare without a table saw unless I was planning on spending many hours hand fitting the joints. The flare parts are big, so the saw will need to have plenty of extensions, and a solid rip fence. The rest of the parts can be made with a circular saw if you opt to buy the flat pack.
A plunge router is a really good idea.
A decent dial caliper. If you have to chose between a cheap digital model (as in Horror Freight), and a dial, get the dial type. I have owned over a dozen dial calipers over the years, and my current daily driver is a 6" dial caliper I purchased from Shars.com, and it seems to be the perfect balance between cost and quality (cost very little, and is durable as heck). I generally work to a tolerance of 1/64" in the woodshop, which is about 0.015" (0.4mm). A dial caliper lets you measure this quickly and accurately even over rough surfaces.
A trammel. A trammel is similar to a compass. Rather than being a pair of legs, is it a long beam with points that can be moved along it. You can spend an obscene amount of money on a trammel, I made mine from some scrap oak. It pivots on a piece of 1/4" (5mm) piano wire that I pointed on the grinder, and has a pencil on the other end. I made it decades ago and it works well.
A machinists combination square. It just needs to be square, and the head needs to lock solidly. I have a Starrett (expensive), not sure what to recommend for a cheap one that does not suck. You wanted one anyway 
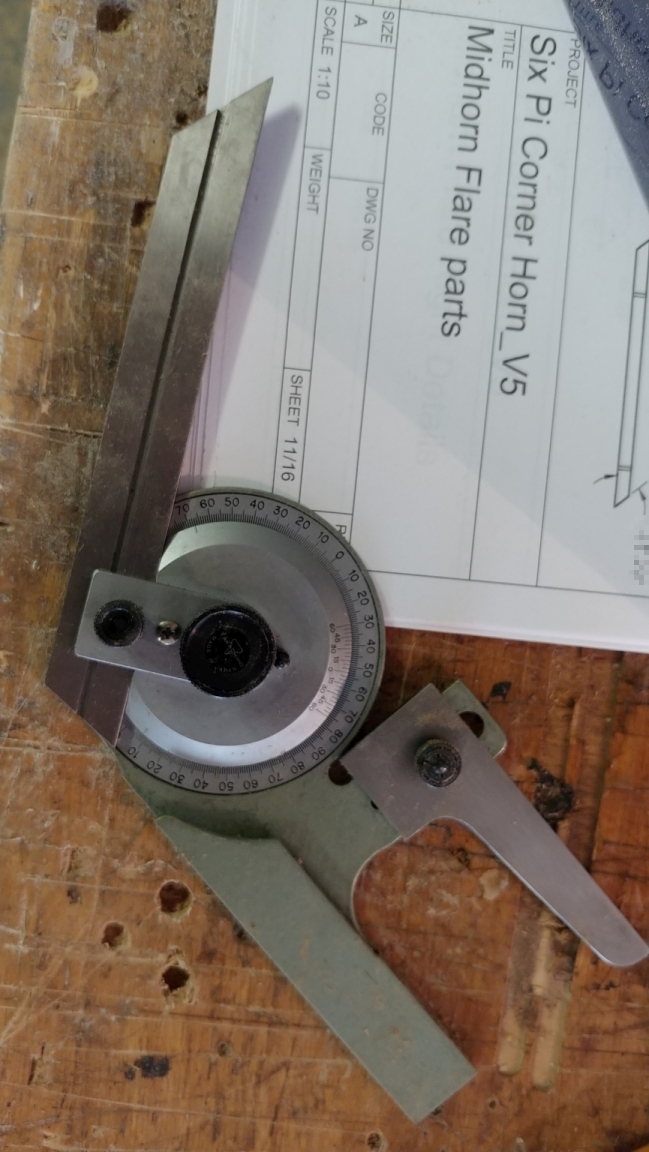
A precision protractor. One that can be set to minutes (or even seconds) of a degree. I am lucky to own a nice Japanese universal bevel protractor, but even used they are very expensive. There are cheap copies for under $60.00 that would probably work, and digitals for even less. Just make sure the moving arm can be put against the saw blade or you will have to make repeated test cuts - digitals often have trouble with this.
A decent dial indicator with a magnetic base is also very handy to have. It takes all the guess work out of nudging the rip fence over a "touch." just plop the thing down, butt it up to the fence, and tap it over the correct amount (you measured the correct amount with your dial caliper ). My daily driver is from Shars.com, I use the mid-priced black faced version. I abuse the heck out of indicators in the metal shop. These hold up very well, and are so cheap I keep a couple spares and toss them when they finally start to get sticky. I almost never use my nice Mitutoyo ones.
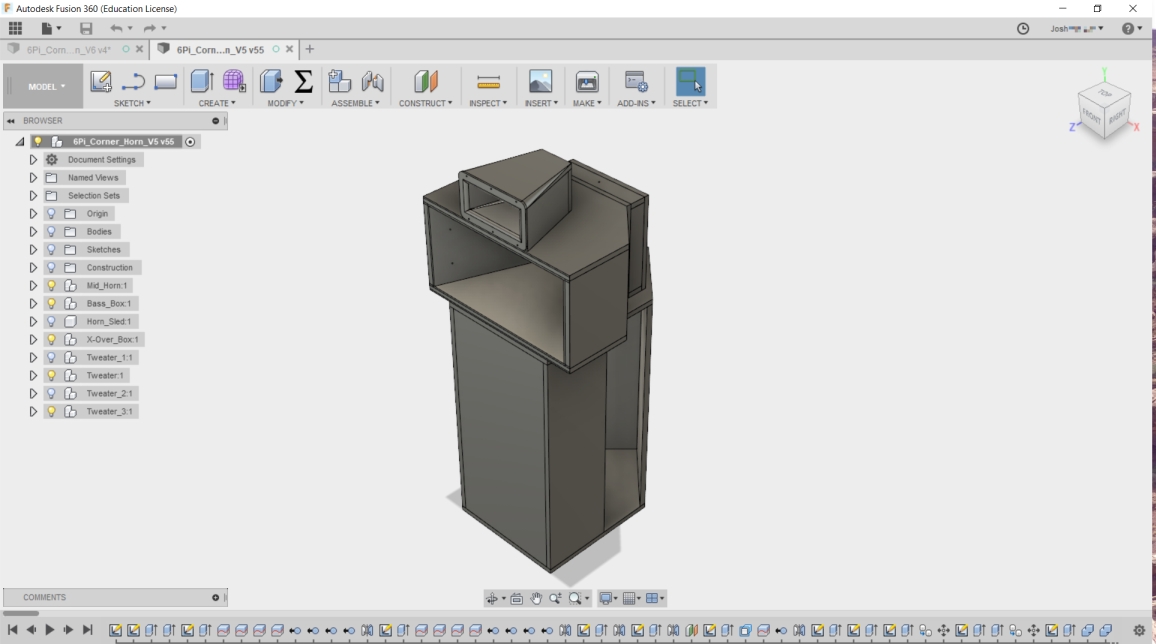
Lastly, is CAD software. I made a number of changes to the design during construction, one of which would have cost me a pair of horn boxes had I not double checked things in CAD first. Cad will help prevent major problems like putting a fastener where a driver goes, and make sure important things like binding posts are not an afterthought. CAD will also let you pull angles directly from the drawing without having to use any math. I have a math degree, I would take no pleasure in figuring out the cut angles for the parts. I use Fusion 360, it is free to hobbyists, and there are many very good tutorials on YouTube.
You will also need a ready stash of cash. The 2Pi Towers and 6Pi Cornerhorns needed 6 sheets of 3/4" (19mm) MDF at $28.00 a sheet. The fasteners ran about $100.00 total, the paint another $100.00. The bathtub liner used for gaskets and the like costs $8.00 a foot. Add in a roll of R15 fiberglass, 3 bottles of glue and other forgotten things. I opted to purchase binding posts from Parts Express, the 6Pi's required 4 pair binding posts and 3 pair banana plugs for each speaker. Expect to spend $100.00 to $300.00 on top of the material costs. All said, this project has cost about $1500.00 plus another $350.00ish for the sub, and I consider it a huge bargain. If you have a spouse type thing living with you, it might be a good idea to consider squirreling some extra cash away for the project
I would also plan on 3 to 8 weeks for construction, and a week to 10 days for painting and curing. If I made these professionally, I would expect they would take about 15 hours over a 6 work day period to construct each speaker before finishing assuming I had all the jigs made up and was practiced at it.
The Midhorn:
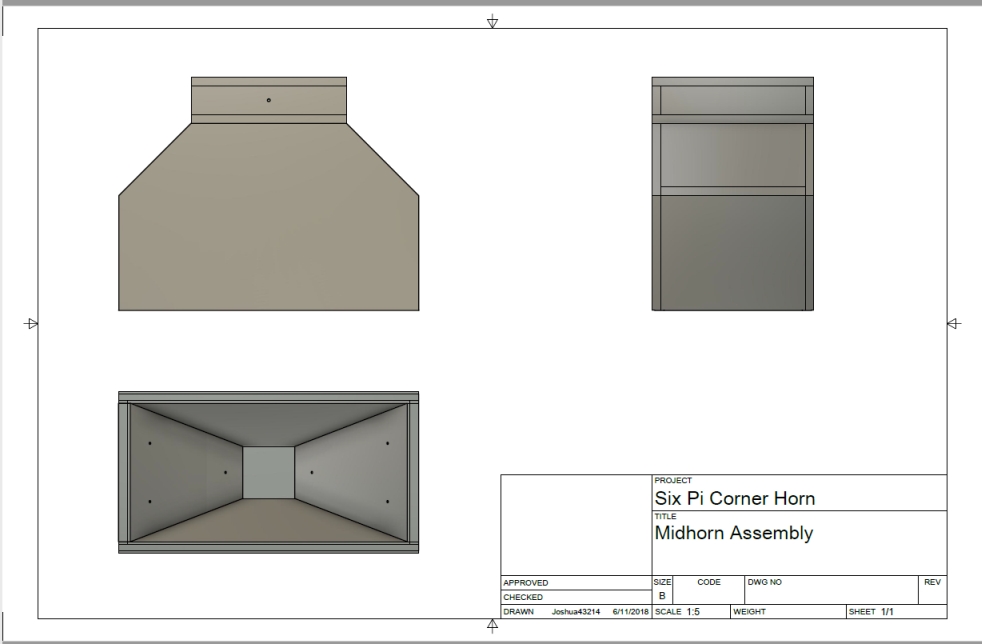
Since the midhorn is the most complex part, I started there. Some issues came up pretty quickly, and I started a thread on the topic.
https://audioroundtable.com/forum/index.php?t=msg&th=21885&start=0&
In a perfect world, I would just make my CAD model public via the Autodesk cloud. Wayne offered me this reply when I asked about doing so:
| Quote: | Also, I appreciate your offer for the CAD drawings, but we already have CAD drawings and even CNC code for some of the more complex models and parts. We don't provide those drawings or G-code because we don't want to encourage third-party flat-pack builders. There have been a few unapproved businesses that have sold flat-pack kits for our models, with one of the most aggressive being just a few years back. They usually start off offering to build cabinets or flat-pack kits as a favor or limited service, but then gradually transition to a full-fledged manufacturing operation.
|
Everything needed to work out the design issues pertaining to the horn are in the above thread, and the plans. Reading the Whitepaper helps a bit. It is more important that both horns be identical, than they meet some theoretical ideal set of dimensions.
The horn box itself is in effect an acoustic suspension speaker - in must be sealed airtight with no leaks. There are several places that can be troublesome for this. The back, which uses a gasket to seal it, must be as flat as possible, and must be able to carry strong fasteners. The join between the sides and the angled sides must be tight and well clamped. The join between the driver mount and the horn throat must be airtight and square to the box. The driver should be square to the box, the flare should not be off center, and the mouth of the horn should be perpendicular to the bottom so it is in the same plane as the front of the bass bin.
I imagine the horn is somewhat tolerant of things being off a bit. Error does accumulate though, so I consider it best to aim for things being a perfect as I can get them.
There is a great deal of geometry in the 6Pi, some is critical, some is not. For instance, the sides of the bass bin do not need to be perfectly square to the baffle. Nor does the baffle itself need to be square to anything other than mostly square to the floor. The front of the bass bin though acts as a baffle for the midhorn, so it should be planar to the midhorn driver. Likewise, the tweeter box is entirely optional, so it's only critical geometry is that it must support the tweeter horn so it is aligned properly.
When I make drawings for anything I build, I constantly ask myself "how am I going to cut that, and how am I going to install that?" It is just part of my design process. Knowing how something will be physically cut and installed can have a huge affect on the design itself. I often makes notes in the plans on construction so that when I am working in the shop I can focus my attention on other important things rather than trying to figure out how to put something together after I have cut all the parts.
My next several posts will go into detail the process I used to make the midhorn so that the horn throat is centered in the box and flare, the driver planar to the bass bin front and the horn mouth, both horn flares are as identical as possible, and that the flares themselves would be symmetric vertically and horizontally. The fact that the midhorns exceeded my design expectations is more a testament to being fussy at a few key points, than my tools or experience. I believe this is something anyone with moderate experience in woodworking can accomplish.
-
 Attachment: CAD_Pi6.jpg
(Size: 154.61KB, Downloaded 3050 times)
-
Attachment: Tools.jpg
(Size: 468.75KB, Downloaded 3026 times)
-
Attachment: CAD_MIdhorn.jpg
(Size: 81.54KB, Downloaded 2968 times)
-
Attachment: Protractor.jpg
(Size: 447.26KB, Downloaded 2997 times)
|
|
|
|
 |
|
Build Thread: 2Pi Towers, 6Pi Corner horns (and possibly a sub and center)
|
|
|
Re: Build Thread: 2Pi Towers, 6Pi Corner horns (and possibly a sub and center)
|
|
|
Re: Build Thread: 2Pi Towers, 6Pi Corner horns (and possibly a sub and center)
|
|
|
Re: Build Thread: 2Pi Towers, 6Pi Corner horns (and possibly a sub and center)
|
|
|
Re: Build Thread: 2Pi Towers, 6Pi Corner horns (and possibly a sub and center)
|
|
|
Re: Build Thread: 2Pi Towers, 6Pi Corner horns (and possibly a sub and center)
|
|
|
Re: Build Thread: 2Pi Towers, 6Pi Corner horns (and possibly a sub and center)
|
|
|
Re: Build Thread: 2Pi Towers, 6Pi Corner horns (and possibly a sub and center)
|
|
|
Re: Build Thread: 2Pi Towers, 6Pi Corner horns (and possibly a sub and center)
|
|
|
Re: Build Thread: 2Pi Towers, 6Pi Corner horns (and possibly a sub and center)
|
|
|
Re: Build Thread: 2Pi Towers, 6Pi Corner horns (and possibly a sub and center)
|
|
|
Re: Build Thread: 2Pi Towers, 6Pi Corner horns (and possibly a sub and center)
|
|
|
Re: Build Thread: 2Pi Towers, 6Pi Corner horns (and possibly a sub and center)
|
|
|
Re: Build Thread: 2Pi Towers, 6Pi Corner horns (and possibly a sub and center)
|
|
|
Re: Build Thread: 2Pi Towers, 6Pi Corner horns (and possibly a sub and center)
|
|
|
Re: Build Thread: 2Pi Towers, 6Pi Corner horns (and possibly a sub and center)
|
|
|
Re: Build Thread: 2Pi Towers, 6Pi Corner horns (and possibly a sub and center)
|
|
|
Re: Build Thread: 2Pi Towers, 6Pi Corner horns (and possibly a sub and center)
|
|
|
Re: Build Thread: 2Pi Towers, 6Pi Corner horns (and possibly a sub and center)
|
|
|
Re: Build Thread: 2Pi Towers, 6Pi Corner horns (and possibly a sub and center)
|
|
|
Re: Build Thread: 2Pi Towers, 6Pi Corner horns (and possibly a sub and center)
|
|
|
Re: Build Thread: 2Pi Towers, 6Pi Corner horns (and possibly a sub and center)
|
|
|
Re: Build Thread: 2Pi Towers, 6Pi Corner horns (and possibly a sub and center)
|
|
|
Re: Build Thread: 2Pi Towers, 6Pi Corner horns (and possibly a sub and center)
|
|
|
Re: Build Thread: 2Pi Towers, 6Pi Corner horns (and possibly a sub and center)
|
|
|
Re: Build Thread: 2Pi Towers, 6Pi Corner horns (and possibly a sub and center)
|
|
|
Re: Build Thread: 2Pi Towers, 6Pi Corner horns (and possibly a sub and center)
|
Goto Forum:
Current Time: Sun Apr 28 12:12:54 CDT 2024
|


 Posting Rules
 Members
 Search
 Help
Help Register
 Login
Login Get a T-Shirt!


")

