|
Home » Sponsored » Pi Speakers » Six Pi Review
| Six Pi Review [message #73886] |
Thu, 20 September 2012 16:40  |
 rkeman
Messages: 78
Registered: March 2010
Location: Florida
|
Viscount |
|
|
Corners can be the undoing of a loudspeaker. Bass becomes exaggerated. Close proximity to the walls results in early reflections that make imaging vague and the highs grainy. Most manufacturers recommend placing loudspeakers well away from corners and the rear wall precisely to avoid these effects. The corner horn is a notable exception to these conventions - the room corners actually act as a part of the speaker, extending loading well into the lower midrange. Sound radiates uniformly over the 90 degree angle formed by the corner, minimizing room interactions above about 250Hz and significantly increasing clarity and sensitivity over that range compared to conventional front radiator loudspeakers. The increased bass resulting from corner loading becomes an advantage rather than a detriment. Corners might not be so bad after all!
Pi Speakers 6 Pi
The 6 Pi is a three-way corner horn based on a vented 12" woofer, a 10" horn loaded midrange driver in a sealed enclosure and the Eminence H290 horn (40° x 90°) with a 1" compression driver. The cabinet is 56" x 18" x 30" (H x W x D) overall. It is offered fully finished, in kit form including the drivers and crossover or as plans only. The basic package includes an Eminence Delta 12LF woofer, Eminence Delta 10A midrange, PSD2002 compression driver with H290 horn (now H290C), and crossovers comprised of 18 gauge air core inductors, non-inductive resistors and polypropylene capacitors. Upgrades include an Acoustic Elegance TD12S woofer, B&C DE250-8 compression driver, and a variety of improved crossover components. Prices for a finished 6 Pi speaker start at $2600 sans shipping and the kit is a modest $400. The midrange horn flat pack kit is $100 and is a supplement to the kit. The Pi Speakers forum is moderated by Wayne Parham and offers a wealth of the information regarding speaker theory and construction. It is well worth a visit for more background and information about this corner horn and a variety of other constant directivity and high sensitivity loudspeaker designs.
Construction and Assembly
The 6 Pi cabinet consists of a rectangular bass module with a two shelf brace located and a rear vent, a sealed midrange cabinet with a removable back panel, and the tweeter enclosure that is primarily cosmetic. The loudspeaker can be constructed as a single unit or with as separate midrange/tweeter and bass modules. Wall thickness is specified as 5/8"; however, I fabricated the enclosure from more readily available 3/4" medium density fiberboard (MDF). A lightly textured satin black acrylic finish (Duratex) applied by roller is perfect for use in my darkened home theater.
The bass cabinet rear panel is double thickness (1-1/2") to accommodate flush mounting of the woofer. The overall cabinet depth is increased by 3/4" to compensate. A 3" flared port cut to length after final assembly to precisely tune the cabinet to 30Hz resides below the woofer. The bottom and top of the bass cabinet are also doubled in thickness (1-1/2") to add strength and accommodate adjustable threaded spiked feet. Unfaced R-13 fiberglass insulation is glued to the back, bottom, side closest to the port and the shelf brace above the woofer as recommended by Pi Speakers.
The midrange horn is constructed both from a cardboard mock-up and assembled as a flat pack purchased from Pi Speakers. The latter includes the driver mounting plate and uses Miller dowels to ease assembly and insure good alignment. Be forewarned that the compound angles required for the horn are exacting and the novice woodworker should strongly consider purchasing the flat pack. Bracing the inside of all four horn flares in several places is critical to damp vibration. Loose fiberglass enclosure fill further damps the enclosure. A spare midrange driver foam gasket is necessary for the front of the Eminence Delta 10A driver in order to prevent cone bottoming against the mounting plate and is available through Pi Speakers for a modest cost. The back panel of the midrange cabinet is braced with a rubber bumper against the rear of the woofer and attached using thin foam rubber gasket tape and 1-1/4" #8 black oxide pocket hole screws placed near the edge of the panel at 2" intervals.
The tweeter cabinet is for cosmetic purposes and I chose to match the shape of the midrange cabinet rather than use the simpler design suggested in the plans. A small amount of fiberglass insulation damps the enclosure.
Crossover Construction
The crossovers are constructed using Janzen 15 gauge air core coils, Dayton and Erse polypropylene capacitors, Dayton 1% tolerance 10 watt non-inductive resistors, and 16 gauge hook up wire mounted on a 1/4" MDF panel with nylon wire ties. Mounted on a slightly oversized piece of dense 1/2" adhesive backed acoustic foam, the crossover boards are attached to the inside side panel of the enclosure with six 1-1/4" #8 sheet metal screw. Two sets of nickel-plated binding posts are located on the lower rear of the cabinet to allow biwiring of the woofer and midrange/tweeter.
Driver Description and Assembly
Two woofers are offered for use in the 6 Pi - the Acoustic Elegance TD12S and the Eminence Delta 12LF. The Eminence use a pressed steel frame, treated paper cone and half roll cloth surround. It offers fine performance at an attractive price and shows very little driver-to-driver variation. For many, and perhaps most, listeners the 12LF should be all that is necessary in the 6 Pi. The AE TD12S used in my build, by comparison, is a hand-assembled precision device made to a very high standard. The Lambda motor design is among the best available featuring very low voice coil inductance that eliminates the need for Zobel impedance correction in the crossover. Operation is very linear operation with vanishingly low distortion and superb high frequency extension for a 12" driver. Availability of the TD12S has been spotty in the past, but the manufacturer is working to resolve the issue. The woofer is attached using #8 black oxide Phillips head screws.
The Eminence Delta 10A is a 10" mid-woofer constructed similarly to the Delta 12LF. The hard paper dust cap is perfectly suited for use in the 6 Pi midrange horn. The driver is mounted to the rear of the mounting plate using an extra front gasket for spacing and 1" #8 black oxide pocket hole screws.
The B&C DE250 1" compression driver uses a high quality polyamide diaphragm and is mounted to the Eminence H290 horn with two bolts provided with the driver. The series of molded veins on the outer surface of the horn are filled with pliable electrician's putty. Adhesive backed 1/2" dense acoustic foam is applied to the exposed surfaces of the horn and wrapped around the horn throat to further damp the structure. The latter is tied down with several loops of thin nylon thread. The final tweeter assembly is heavy and non-resonant. The woofer and horn are both mounted to the cabinet using 1" #8 black oxide machine screws. A small amount of flexible rope caulk was used in place of gasket material for the horn and two additional screws are added at the center of the vertical sides of the horn.
Speaker Placement and Room Set Up
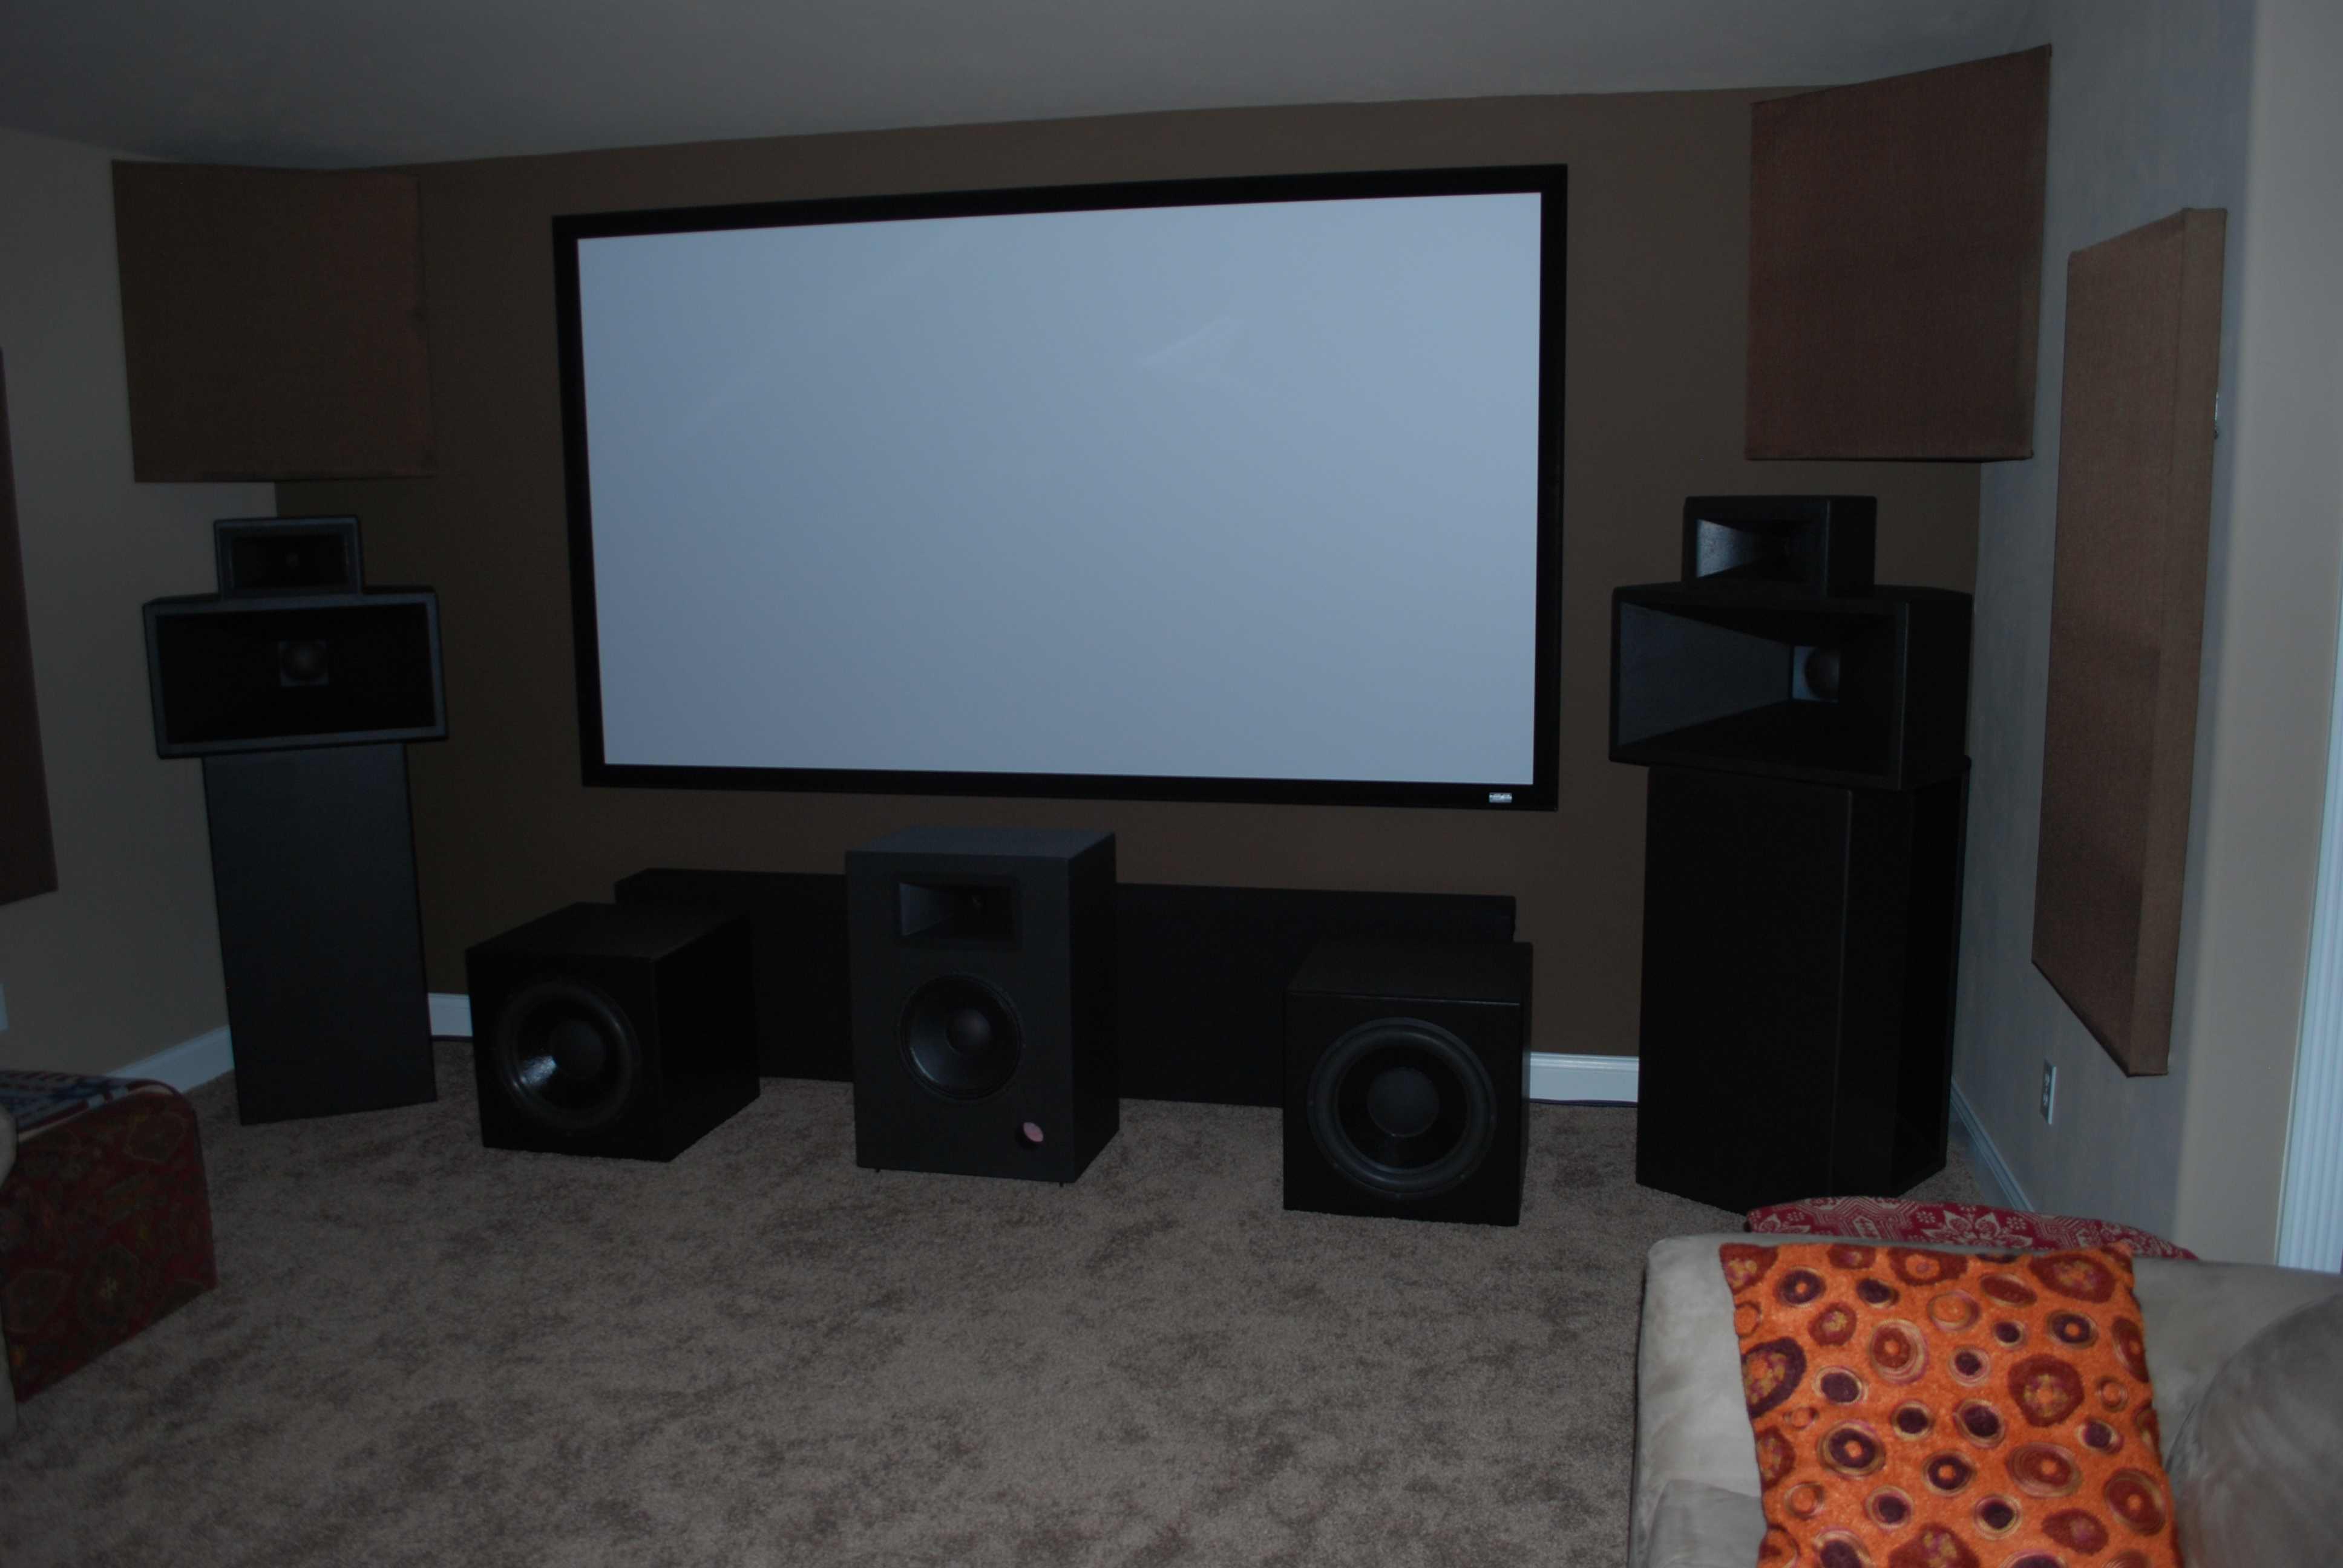
The 6 Pi requires corner placement with at least 5-6" of adjacent wall on either side. Speaker toed-in can be varied slightly to accommodate a variety of listening distances. Acoustic treatments in my home theater include first reflection point damping (2' x 4' panels of 4" Owens Corning 903 fiberglass in wooden frames), substantial corner bass absorbers (8' thick Owens Corning 903 in 2-1/2' and 4' lengths); absorbent window coverings and a heavily padded medium cut pile carpet. A slightly modified floor standing 3 Pi center channel and two stand mounted 3 Pi surrounds employing Eminence Delta 12LF woofers and B&C DE250 tweeters are used for multichannel listening. An Onkyo TX-NR3009 receiver drives the front speakers in biamplified mode and the remaining speakers using the dedicated single channel amplifiers. Two custom subwoofers based on Adire Tumult 15" drivers in sealed cabinets and driven by an SVS STA-800H supplement the bass and handle the low frequency effects (LFE) channel. Sources include an Oppo BPD-93 BluRay player and Scientific Atlanta HD Cable Tuner.
Listening Impressions
The 6 Pi provides smooth and clean sound that lacks any distinct tonal emphasis. Bass is defined and well balanced with the upper range, extending to 30Hz in-room. Vocals and the spoken voice are naturally reproduced without the pinched nasal quality and chestiness found in so many loudspeakers. Dynamics are amazingly life-like and convincingly convey the scale of music ranging from a string quartet to heavy metal. Little power is required by the 6 Pi thanks to its' high sensitivity (97 db/w/m) and most any amplifier will easily drive the benign 8 ohm load presented by the speaker. Imaging is often compromised in large multi-way loudspeakers leading many audiophiles to believe that only small stand mounted monitor can excel in this. With the 6 Pi the soundstage is solid and stable. Depth and height are presented naturally and accurately convey the hall ambience found in good recordings and motion pictures. The LEDR test found on the Chesky Jazz Sampler and Test disc confirmed these impressions. It is actually astounding that a speaker of this size can disappears as well as the 6 Pi. The tonal accuracy and soundstaging characteristics of the 6 Pi are shared with the 3 Pi and they work well together to greatly enhance the presentation of multichannel sources in my home theater.
Measurements
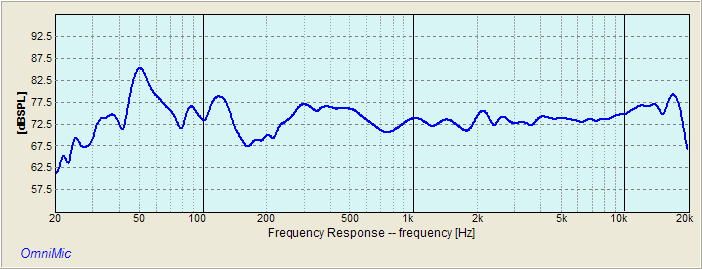
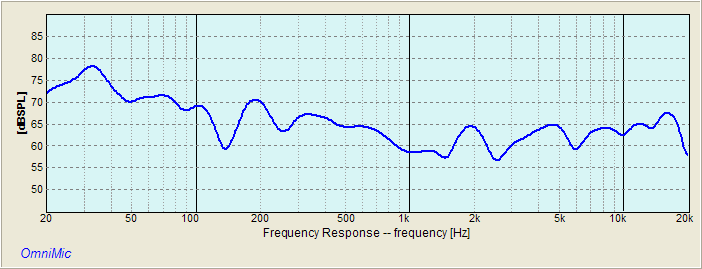
Measurements have been performed using the Dayton Audio Omnimike system in my listening room. Frequency response measurements had 1/12 octave smoothing and the response would likely vary substantially below 300Hz in other rooms.
Figure 1: 6 Pi 1 m room response on midhorn axis

Figure 2: 6 Pi 3m room response at 36" listening height

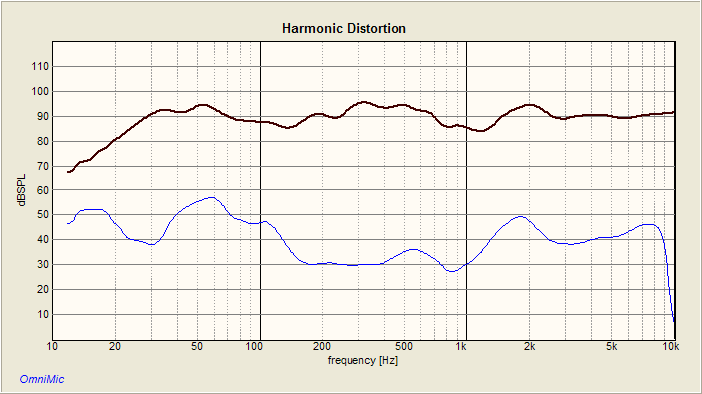
Figure 3: 6 Pi 3 m distortion curve

The curves appear to confirm the neutral tonal character and clean sound that is appreciated on auditioning the 6 Pi.
Conclusion
The Pi Speakers 6 Pi is simply an outstanding loudspeaker. It offers superb performance in a relatively affordable package and is designed to make the most of listening rooms with appropriate corners. It will mate with a wide variety of amplification and produce enough sound to fill even large domestic rooms. The cabinet construction is more difficult than the two-way 3 Pi, but the increased performance is well worth the effort. Highly recommended.

|
|
|
|
|
|
|
|
|
|
|
|
|
|
|
|
|
|
| Re: Six Pi Review [message #73930 is a reply to message #73886] |
Mon, 24 September 2012 14:06   |
 |
 Wayne Parham
Messages: 18997
Registered: January 2001
|
Illuminati (33rd Degree) |
|
|
As an aside, measurements made in a trihedral corner outdoors naturally do not show room modes, the response down low is ruler-flat. But indoors, room modes take over and make hot spots and dead spots, causing ripples in response. I'm sure in your case, the room modes clean up considerably when the subs and other speakers are added in. Do you have any response charts with subs running?
On the other hand, the pair of mains-only charts at 1M and 3M (3 feet and 10 feet) are excellent for illustrating the benefits of the constant directivity cornerhorn, because they show movement of the anomalies, which proves the absense of self-interference from the nearest boundaries, the walls adjacent to the corners. The fact that the anomalies move in frequency proves them to be caused by room modes and not by self-interference.
Looking at the measured response charts, you can clearly see the room modes below about 200Hz. This is always present, and is the reason for multisubs. What is also clear, is the absense of self-interference notches from the nearest walls, the ones behind and beside the speaker. This is significant, because it shows how effective the constant directivity cornerhorn configuration is.
In most cases, you can't really tell which ripples are caused by modes and which are caused by self-interference from a nearest boundary. They're similar in that they are caused by reflections from the walls, floor and ceiling. The only difference is that modes are standing waves, whereas self-interference notches from a boundary occur without standing waves. They're just a cancellation effect between the direct sound and a reflection.
But there is one special case where you can tell the difference. The reflection from the wall behind the speakers is delayed by the same amount no matter what distance the microphone is placed from the speaker. So in this case, the self-interference ripple doesn't change frequency even when the microphone is moved. As long as the angle of reflection remains constant, the frequency of the anomaly remains constant too.
This helps identify self-interference notches. When you move around in the room, the microphone passes through modal regions. This changes response due to room modes. Some frequencies will peak and others will dip, and the ripple will move as you change positions. If you change the angle of incidence to the nearest boundary, its self-interference notch will change frequency too. But if you do not change the angle of incidence - just the distance - then the frequency of the response anomaly will remain the same.
So to learn the effects of a particular boundary reflection, measure the response while moving the microphone away, perpendicular to the boundary. The self-interference notch from that boundary will remain at the same frequency. This will tell you the amplitude of the anomaly caused by a particular boundary. If you do not see a notch that stays put, then there is no delayed reflection, as is the case with constant directivity cornerhorns.
A self-interference notch from the wall behind the speakers will remain at the same frequency even as the microphone distance is varied. The floor bounce notch will move because the angle of reflection changes. Room modes will change because they are standing waves that form fixed "pockets" of sound, like a checkerboard pattern that the microphone moves through. But the self-interference from the back wall remains constant.
When you move the measurement microphone through the room, in most cases you see a mixture of modal and self-interference anomalies. Some move as the microphone is moved, but others remain fixed. The largest one remains fixed, actually, the one that comes from behind the speakers. But in the case of the constant directivity cornerhorn, it doesn't even exist. A constant directivity cornerhorn has no self-interference from the walls behind the speaker. The only thing that remains to be solved are room modes, and they are best mitigated using multisubs.
If the most offensive anomalies are at low frequency, as is often the case with constant directivity cornerhorns, then subs can be placed fairly distant from the main speakers for best results. But if they are higher in frequency, I would prefer a pair be placed closer, much like flanking subs. They aren't needed to smooth self-interference notches, so it isn't the same thing. They don't need to be placed between the mains and the nearest boundaries, nor could they be. But they do need to be symmetrically placed and somewhat close to the mains, so they can be used up into the lower midrange without localization problems, similar to the flanking sub approach.
I think your subwoofer placement as shown in the photo probably works pretty well for this, since the second and third axial modes between your relatively narrow side walls are probably at least partly responsible for the anomalies at the upper end of the modal region. Sometimes having the subs on risers helps too, since the upper frequency modes are often vertical axial modes. The lower frequency modes are the primary modes, lowest being from the longest dimension. Those can be smoothed using subs placed further from the mains, run only at very low frequency.
|
|
|
|
|
|
Goto Forum:
Current Time: Mon Jan 26 09:42:23 CST 2026
|


