Home » Sponsored » Pi Speakers » Excited =)
Re: Excited =) [message #68483 is a reply to message #68482] Tue, 05 July 2011 14:18 Go to previous messageGo to next message
Wayne Parham is currently offline  Wayne Parham
Messages: 18783
Registered: January 2001
Illuminati (33rd Degree)

Looks great! I like how you have them positioned.

Re: Excited =) [message #68484 is a reply to message #68483] Tue, 05 July 2011 16:55 Go to previous messageGo to next message
justphil is currently offline  justphil
Messages: 114
Registered: December 2010
Viscount
Thanks Wayne.
Am I supposed to use some sort of a gasket for my final mounting of the speakers? I really appriciate your work and commuinty support of these wonderful speakers.
Phil
Re: Excited =) [message #68485 is a reply to message #68484] Tue, 05 July 2011 18:42 Go to previous messageGo to next message
Wayne Parham is currently offline  Wayne Parham
Messages: 18783
Registered: January 2001
Illuminati (33rd Degree)

The woofer has a built-in gasket, so you won't need another on most surfaces. The tweeter doesn't have a gasket, but does prove to be airtight on smooth surfaces. You can cut a thin gasket from cardboard or PVC if you want, but in most cases, it's not necessary.

Re: Excited =) [message #68486 is a reply to message #68256] Tue, 05 July 2011 23:37 Go to previous messageGo to next message
Dave_S is currently offline  Dave_S
Messages: 28
Registered: April 2011
Chancellor
You made really quick progress on those. They look good.

As far as the gaskets, what Wayne said should work. I took Wayne's advice from a previous post about using a shower liner gasket from Home Depot. That seems to work well also.

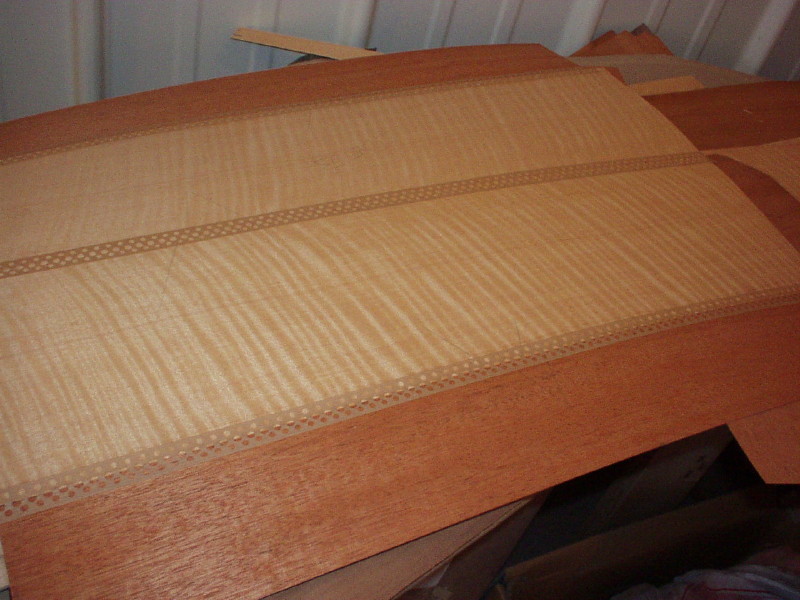
I know that you said that you said that you are considering options for finishing. From what I have seen of your design, I would recommend a 2 ply veneer if you decide to finish them with a wood veneer. I (stupidly) decided to use strips of wood veneer and splice them together myself. I did that a long time ago when stock veneer was thicker and it worked well. To replace what I screwed up, I bought a 2 ply veeneer. It was very stable and not prone to wrinkling or bubbles. I wish the entire covering of my speakers were covered with 2 ply veneer. I put the final sheet of my spliced veneer on this weekend. There is no photographic evidence of the botched attempt.
Re: Excited =) [message #68487 is a reply to message #68486] Wed, 06 July 2011 01:29 Go to previous messageGo to next message
justphil is currently offline  justphil
Messages: 114
Registered: December 2010
Viscount
Thank you for the compliment. Can you possibly link me the material you are talking about. I have never veneered anything before. Is it hard to do?
Re: Excited =) [message #68488 is a reply to message #68487] Wed, 06 July 2011 06:25 Go to previous messageGo to next message
Bill Epstein is currently offline  Bill Epstein
Messages: 1088
Registered: May 2009
Location: Smoky Mts. USA
Illuminati (2nd Degree)
The site I referenced below is a great place to start. If it isn't mentioned, Tape-ease.com is a good source for veneer ( I like NBL, No Black Line)


http://audioroundtable.com/forum/index.php?t=msg&th=16118

With that double baffle, you have plenty of material to round-over and wrap-around the NBL veneer seamlessly. Just don't make the mistake I did and place your dowels longitudinally Very Happy

http://audioroundtable.com/forum/index.php?t=msg&th=16209

index.php?t=getfile&id=534&private=0

Thats' wax paper over the dowels; kind of a belt and suspenders way to keep out of contact adhesive hell but turned out to be unnecessary.

I use dowels because they come off the adhesive easily w/o taking a lot of it with. Once I got the technique down, I decided that next time, I'll round-over the rear corners as well and wrap the veneer all the way around to the back.

The far smaller and lighter 2Pis should be really easy.


Re: Excited =) [message #68489 is a reply to message #68488] Wed, 06 July 2011 08:30 Go to previous messageGo to next message
justphil is currently offline  justphil
Messages: 114
Registered: December 2010
Viscount
Double baffle? Do you mean since I placed the whole baffle face over the sides instead of between them? Thanks for the links. Will look into them.
Re: Excited =) [message #68495 is a reply to message #68489] Wed, 06 July 2011 19:44 Go to previous messageGo to next message
Dave_S is currently offline  Dave_S
Messages: 28
Registered: April 2011
Chancellor
I thought the front baffle was double also. With "IMG_2288.jpg", there are two distinct shades on the edge of the front baffle that makes it look like two sheets are sandwiched. However, when I compare the thickness of the sides, the total thickness looks similar.

The link that Bill provided looks like decent veneer and is probably cheaper. I bought mine locally at Rockler Woodworking. The 2-ply has one side with grain running one way and the other side has grain running perpedicul. It helps to stiffen the sheet. That link for what I used is here:

http://www.rockler.com/product.cfm?page=2217&filter=veneer

The main thing that I liked about the veneer was that it seemed to lay flat. If the veneer is not stiff enough, the chances of the veneer not lying flat increases. I had seen other veneers that looked so thin that they would not lay flat. Because of the original veneer that I chose, I made a veneer press and used regular glue. In the end I liked it, but it was a lot of work and expense. I will do future projects with the press, but I don't think that I would steer others in that direction. You may want to get a recommendation from somebody else about a brand of contact cement. What I chose was nothing like what I had used in the past despite my best attempt to buy a quality product. That was one part of my problem and why I went to using regular glue and making the press. I will post the press pictures when I do my post on my build.

As far as veneering, I have never used dowels like Bill. I generally have used several layers of parchment or wax paper and pulled one sheet out at a time. One has to be careful to not trap the wax paper in there,so dowels may help. My laminate counters have a piece of wax paper trapped inside. With the veneer that I had, a few seconds of light sanding seemed to improve adhesion. So for me, my original problems (not including the 2 ply veneer) were using thin veneer that did not lay flat, using a less effective contact cement, and not sanding for better adhesion. You would have a hard time not improving on my initial results.
Re: Excited =) [message #68496 is a reply to message #68495] Wed, 06 July 2011 22:02 Go to previous messageGo to next message
Bill Epstein is currently offline  Bill Epstein
Messages: 1088
Registered: May 2009
Location: Smoky Mts. USA
Illuminati (2nd Degree)
Dave, I'll really look forward to seeing your press. A few years ago, when veneering with PPR (urea resin), I bought half a dozen cider pres type screw clamps on sale from Woodcraft thinking I would build a press. Turned out I would have needed 2 dozen and a brooklyn bridge construct of angle iron so they're stored away somewhere.

I've also thought of vacuum bagging, the $300 for the pump and bags doesn't bother me so much as having to veneer both sides of the panels, then gluing up, then edge-banding and so forth.

PPR is the King of veneer glues and with Bill Martinellis help, how I taught myself to do this:

index.php?t=getfile&id=540&private=0


Takes lotsa clamps, 24 hour clamp time and you still have bubbles that need to be heated and re-clamped.

Weldwood Contact Adhesive, the solvent kind, NOT the water base or gel, is the answer to "lets listen to these things this week"!
A ridiculous amount of custom, high-end furniture is made with it, not just countertops. BUT, you can't use unbacked, or what we call leaves of veneer. The pros mostly use paper backed cause it's cheaper than 2 ply. I like NBL 'cause there is no black line in lighter veneers like Maple and Cherry and it's really flexible, draping a 3/4" round-over with ease. I pay about $75 for those species and Walnut plus about $20 shipping for a 4x8 sheet.

One drawback to laid-up 4x8s as opposed to leaves is you can't bookmatch and have no choice of grain. The new Walnut speakers look exciting at first, but frankly, they're kinda "busy" up close day-after-day.


I prefer the more straight-grained look of the same veneer, different batch that made the 4Pis. I suspect that I should be able to specify either rotary (busy) or flat cut (straight-grained) in the future. I'm already planning the next build, a pair opf 2Pi Towers with the S-B 29 Tweeter, which will be 1/4 sawn Cherry.

Re: Excited =) [message #68518 is a reply to message #68496] Thu, 07 July 2011 22:48 Go to previous messageGo to previous message
Dave_S is currently offline  Dave_S
Messages: 28
Registered: April 2011
Chancellor
Bill,

I may start my build post this weekend, even though the speakers will not be fully complete. I have 8 clamps like the ones you are talking about. They are made by Jorgenson. You are right about the force needed. The glue bottle says one should have 100-225 psi of force. I reached 10 psi if lucky. I think the clamp force is closer to a vacuum press, which could never exceed 14.7 psi (atmospheric pressure). I would definately try the glue you recommended next time. Since you have clamps already, the press that I designed may be at least worth considering. I will probably add 4 more clamps for my next project. Trying some fancier veneers like you use would be interesting. I like zebrawood, but I have never found the right project for it. With the clamps, I might be able to experiment on small projects.
Previous Topic: PI4 Build for home theatre
Next Topic: Any Pi builders in Ireland ?
Goto Forum:


Current Time: Mon Nov 18 02:16:39 CST 2024

Sponsoring Organizations

DIY Audio Projects
DIY Audio Projects
OddWatt Audio
OddWatt Audio
Pi Speakers
Pi Speakers
Prosound Shootout
Prosound Shootout
Miller Audio
Miller Audio
Tubes For Amps
TubesForAmps.com

Lone Star Audiofest