Posted by Wayne Parham [ 67.66.228.22 ] on November 16, 2004 at 01:54:33:
Recent discussions about cooling vents and ducting techniques have been difficult without illustrations to accompany them. So I've made a few simple drawings to describe the techniques I'm planning to explore for cooling high-power loudspeakers.
This was prompted by the B12 subwoofer project, and is an evolution of that effort. What started as a requisition for a flux stabilized subwoofer with improved performance has become a system design. The B12 was to use a shorting ring to reduce harmonic distortion by providing a symmetrical magnetic field even in the presence of voice coil current. This could be used in new cabinet designs or to retrofit existing ones. The effort has changed to a basshorn design that uses a push-pull plenum to provide symmetry. This will be used in two new horn designs, the 12π and 15π basshorns.
The main feature of these basshorns is the push-pull plenum to cancel harmonics and reduce distortion. But during the B12 effort, it was clear that many people were interested in improved power handling too. This, combined with the fact that one of the two drivers in the push-pull plenum will have its cooling vent exposed to the horn throat made it attractive to find alternate methods for cooling. It is desirable to duct the cooling vent somewhere both for enhanced power handling and for the reduction of noise from vent turbulence.
Some have been unclear as to what the cooling vents would do, and what impact could be expected from them. Some have even thought that the reduction of distortion sought was somehow related to relieving pressure from behind the vent. So I thought it would be good to clarify the goals of the effort to improve the cooling mechanism.
First, it should be understood that the push-pull plenum and the cooling vent are two separate issues. The push-pull plenum is what is primarily responsible for reducing distortion. An explanation for how this happens is given here.
Second, it should be understood that improvements to the cooling vent are not intended to improve distortion or loading. They are done only to improve heat transfer, and so increase power handling ability. The possibility of noises from vent turbulence is also addressed, by routing the vent to a place where it isn't audible.
Third, the design is not technically difficult, but it is new. Because of this, there are some tests that are required to know what is necessary. I am confident that it can be made to work, and I am writing this to show you why I'm confident in the idea. But the exact implementation will still take some testing to know what is necessary and what's best.
In particular, there are three implementation possibilities that can be used. Each of them is more complex than the one that precedes it. But even the most complex arrangement is no more difficult than putting a heater core in a car. It is an exceedingly simple system. So even the most complex arrangement is not difficult to implement at all.
The thing that has hung up some of the people who have examined this is that the cooling vent of the loudspeaker leaks to the rear side of the cone, under the spider. This is of practically no consequence when used in bass-reflex loudspeaker systems or horns with open backs or large rear chambers. But it may be an issue in sealed boxes and some horns. If it is a problem, then the cooling vents can be ducted to an intercooler, so that the entire cooling system is sealed.
Lets look at the systems, one by one:
First, the loudspeaker without a vent:
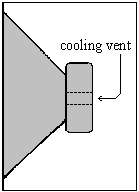
This is a cutaway view of a loudspeaker without a cooling vent. Heat builds up in the voice coil gap and is only dissipated by heat transfer to metal surrounding the gap in the front plate and the center pole. Pressure behind the dust cap increases the stiffness of the suspension. By venting the area behind the dust cap, it becomes a piston that moves air back and forth in the vent. This also provides air movement within the gap, greatly increasing voice coil cooling and heat dissipation. Pressure behind the dust cap is relieved, so the suspension is made more loose. This is attractive on high-excursion designs. This venting arrangement works great compared to a similar loudspeaker without a cooling vent. Power handling is increased considerably. But it works best when the cabinet is open or large. If the cabinet is made very small and sealed, it acts like the vent is plugged. Pressure exists in the cabinet, and the air inside is rapidly heated. Heated air increases static pressure behind the cone. If the heating is extreme, vent cooling grows less and less effective, and the system goes into thermal runaway. So an alternative is considered: Vent to the outside of the cabinet. This is a simple solution, requiring nothing more than a couple of pipe fittings and a hose. If the hose is short and the cabinet seal is not critical, this is probably sufficient. But if the hose is long then heated air will simply travel back and forth in the line. The only heat dissipation is whatever can be transferred to the line and carried away by it. And there is an air passage through the voice coil gap that acts like a very small restricted port between the cabinet interior and exterior. The cooling problem can be solved with the addition of a valve. Since the loudspeaker cone acts like a piston, without a valve, the air pump doesn't work very well. Air moves back and forth, but there is nothing to create unidirectional flow. But the installation of a simple pair of restrictions can induce unidirectional flow. This valve will let the speaker pull cool air in, and purge warm air out. This solves the problem of cooling, by making the pump more efficient and causing it to purge warm air and and bring in cool air. But there is still a leak in the system. The rear of the cone does not hold static pressure, and instead there is a slight leak out the vent. Depending on the configuration of the loudspeaker, this may or may not be a problem. If the system must be sealed, an intercooler may be employed. Instead of venting to outside air, the ducts are connected to an intercooler. The entire duct is sealed. Warm air from the hot voice coil is blown out through the hot side valve, through the intercooler and returned through the cool side to be drawn in by the loudspeaker. While this may seem rather complex, it really isn't. The fitting for the loudspeaker is a press-fit pipe fitting with two exits. It could also be threaded, if the loudspeaker vent were threaded. A vane is welded in the fitting that impedes flow in one direction. Passage through the cabinet is provided with a panel mount pipe fitting. Connections are made using rubber hose and clamps. The intercooler is also available off-the-shelf; Anything that provides radiating vanes will work. Heater cores, air-conditioner condensers, transmission coolers or turbocharger intercoolers - Any of these can be put into service. Pick one that has a substantial volume of air in the pipes and lots of cooling vane surface area. Best to find one that is inexpensive and convenient to mount. Flow rates and pressures are low, so that is not a difficult requirement to fill.
[ PiSpeakers Forum ] [ Help ]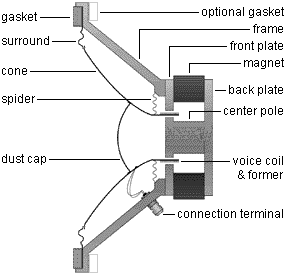
Loudspeaker without Cooling Vent
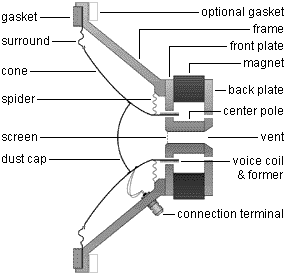
Loudspeaker with Cooling Vent
Vented Loudspeaker in Cabinet
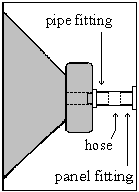
External Cooling Duct
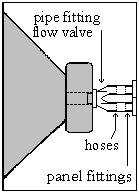
Air Pump Valve
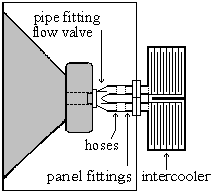
Loudspeaker Cooling Pump Valve and Intercooler