Posted by Wayne Parham [ 76.196.200.56 ] on July 24, 2007 at 17:09:00:
This is the end result of a long time dream of mine, to have a very high quality wood horn tweeter for my speakers. I wanted a horn that had the right acoustic properties and be visually appealing too. There are lots of good plastic horns, but they don't look all that hot. And there are plenty of nice looking wood horns, but none had the acoustic properties I was looking for. This horn does everything I wanted: It is acoustically and aesthetically beautiful.
There are a few significant advantages of horns over direct radiators. One is their increased SPL output. This, in turn, makes them require less power. It also greatly reduces distortion at a given SPL compared to direct radiators, because the diaphragm moves much less and because the voice coil isn't heated as much with the higher current required to move a direct radiator. And a carefully designed horn is able to provide controlled directivity in ways that a direct radiator cannot possibly achieve.
 |  |  |
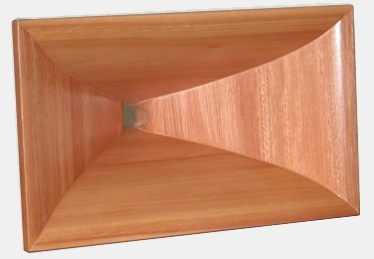
As you can see, the π Speakers wood tweeter horn is very attractive. It is cut on a CNC machine, which gives it graceful curves on the outside of the flare in addition to those required of the inside for acoustic properties. Rather than having simple flat external sidewalls, these are cut to match the inner flare. It looks like the wood has been bent to shape, but it has not. It is cut this way out of a single block of wood for each side.
Acoustically, the goal was true and accurate amplitude response off-axis as well as on axis. That's no easy feat, and is where this horn is set apart from others. My main focus is along the horizontal plane. Response on-axis should be good but so should it be anywhere from side to side. Response should be uniform through vertical movement as well, but gradual collapsing directivity is preferred in the vertical plane in order to reduce floor and ceiling reflections and also to increase top-octave energy.
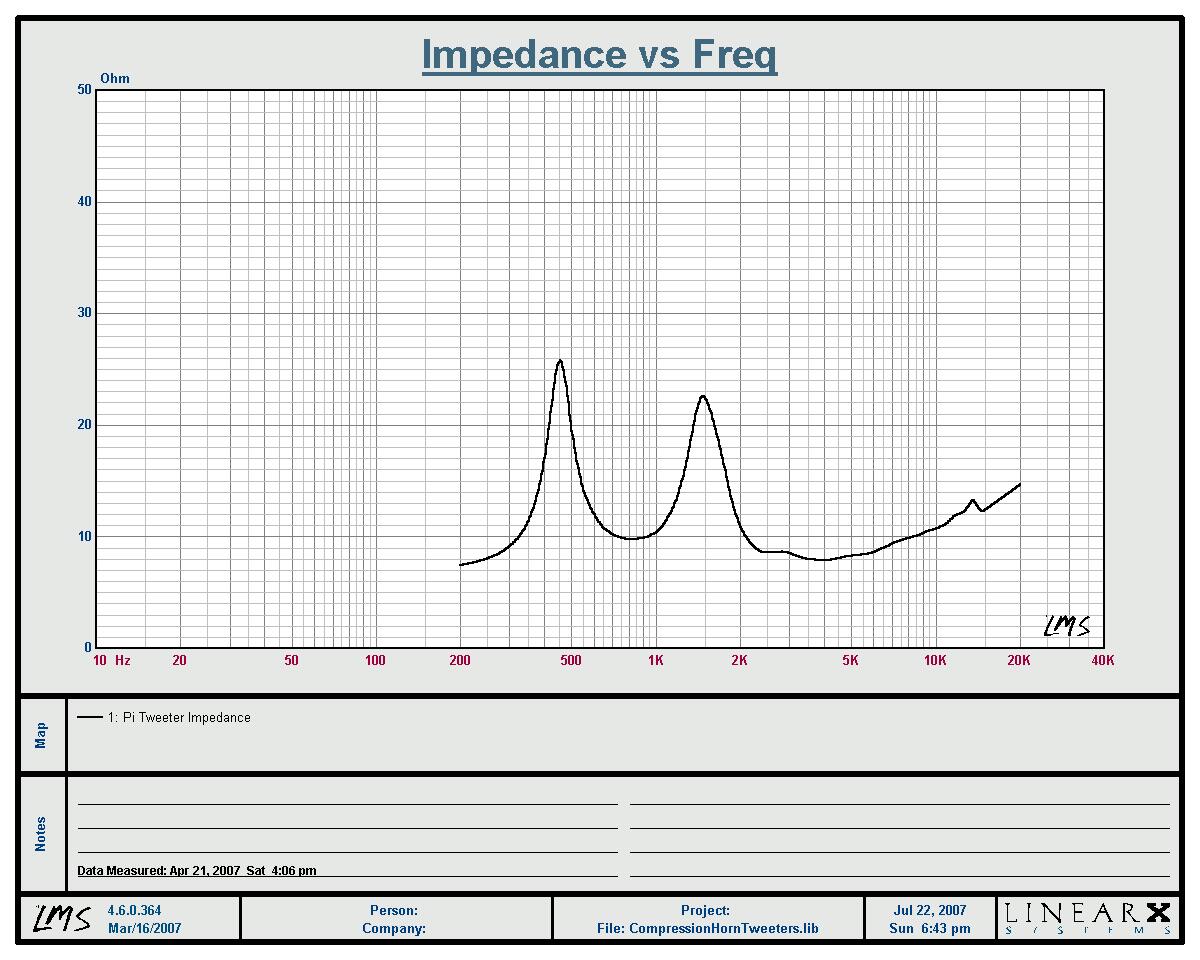 Impedance | 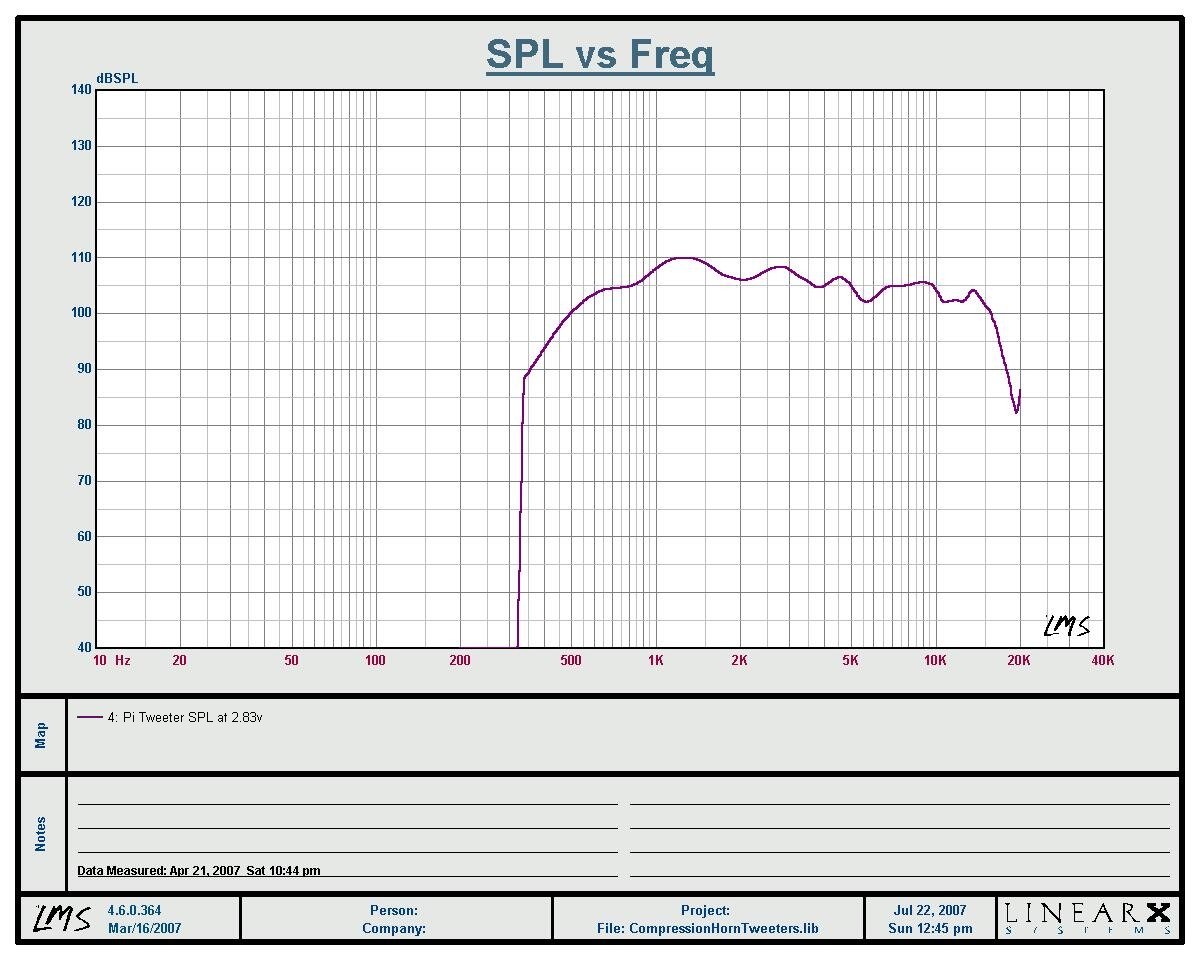 Response | 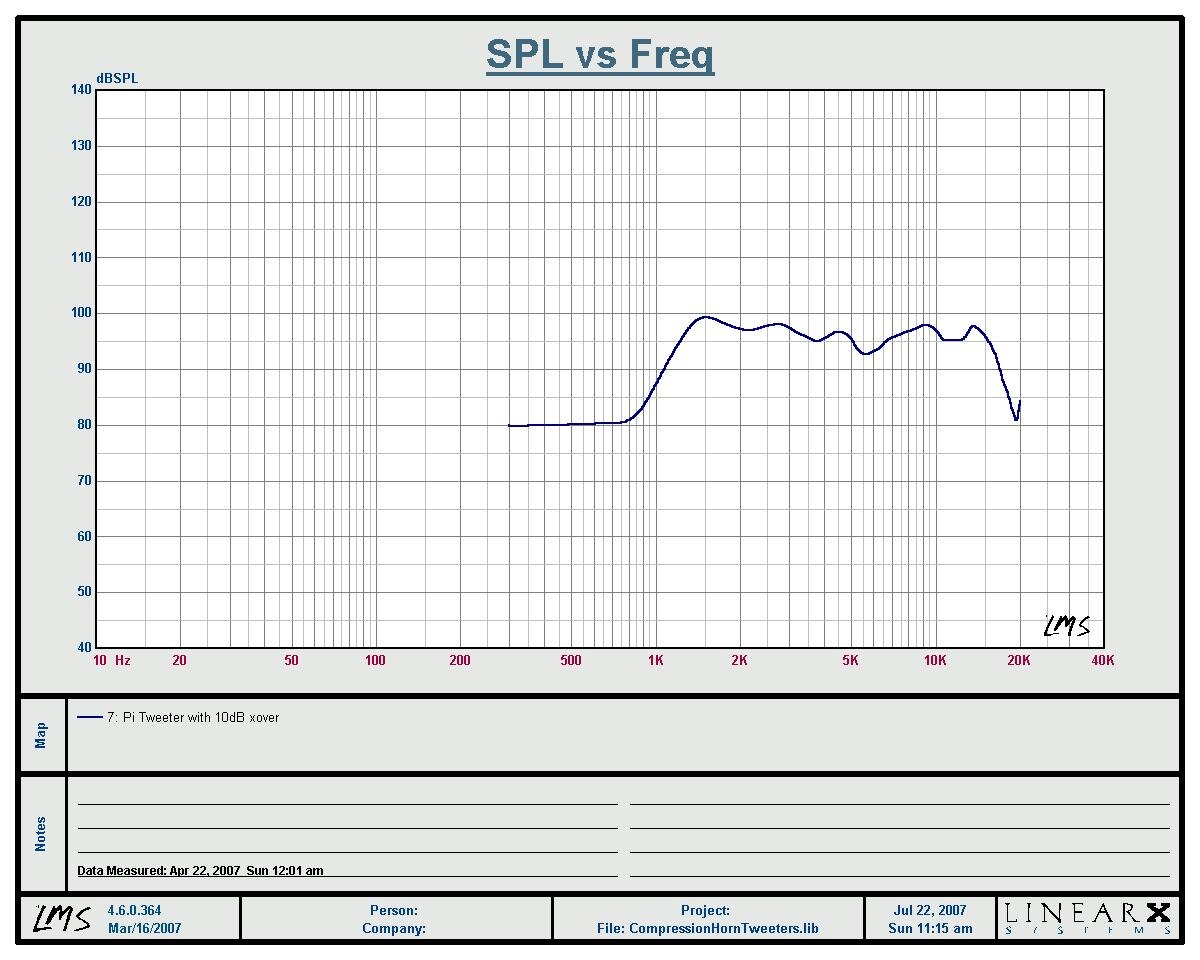 With π Crossover |
The compression driver chosen was the Eminence PSD2002-8. Other compatible drivers include the B&C DE250, DE400 and DE500 and the TAD 2001. I chose the Eminence PSD2002-8 because I think its performance is good and its price is reasonable. All measurements were taken using LMS 4.0 with the calibrated M51 microphone.
As you can see above, the horn/driver combo has average output about 105dB/2.83v/M. Response starts around 600Hz and is strongest around 1kHz, with a gradual slope downwards to 16kHz. The tweeter can be used without any equalization at all, or a slight amount of compensation can be used to bring up the top octave, as is done in the π 1.6kHz crossover designed for use with this tweeter. With the π crossover, this horn is flat +/-3dB from 1.6kHz to 16kHz.
The PSD2002 driver has some response ripples, but none greater than +/-3dB from 1.6kHz to 16kHz. There is a +5dB rise between 1kHz and 1.5kHz, for those that may want to crossover lower. Overall, the on-axis response curve is very nice.
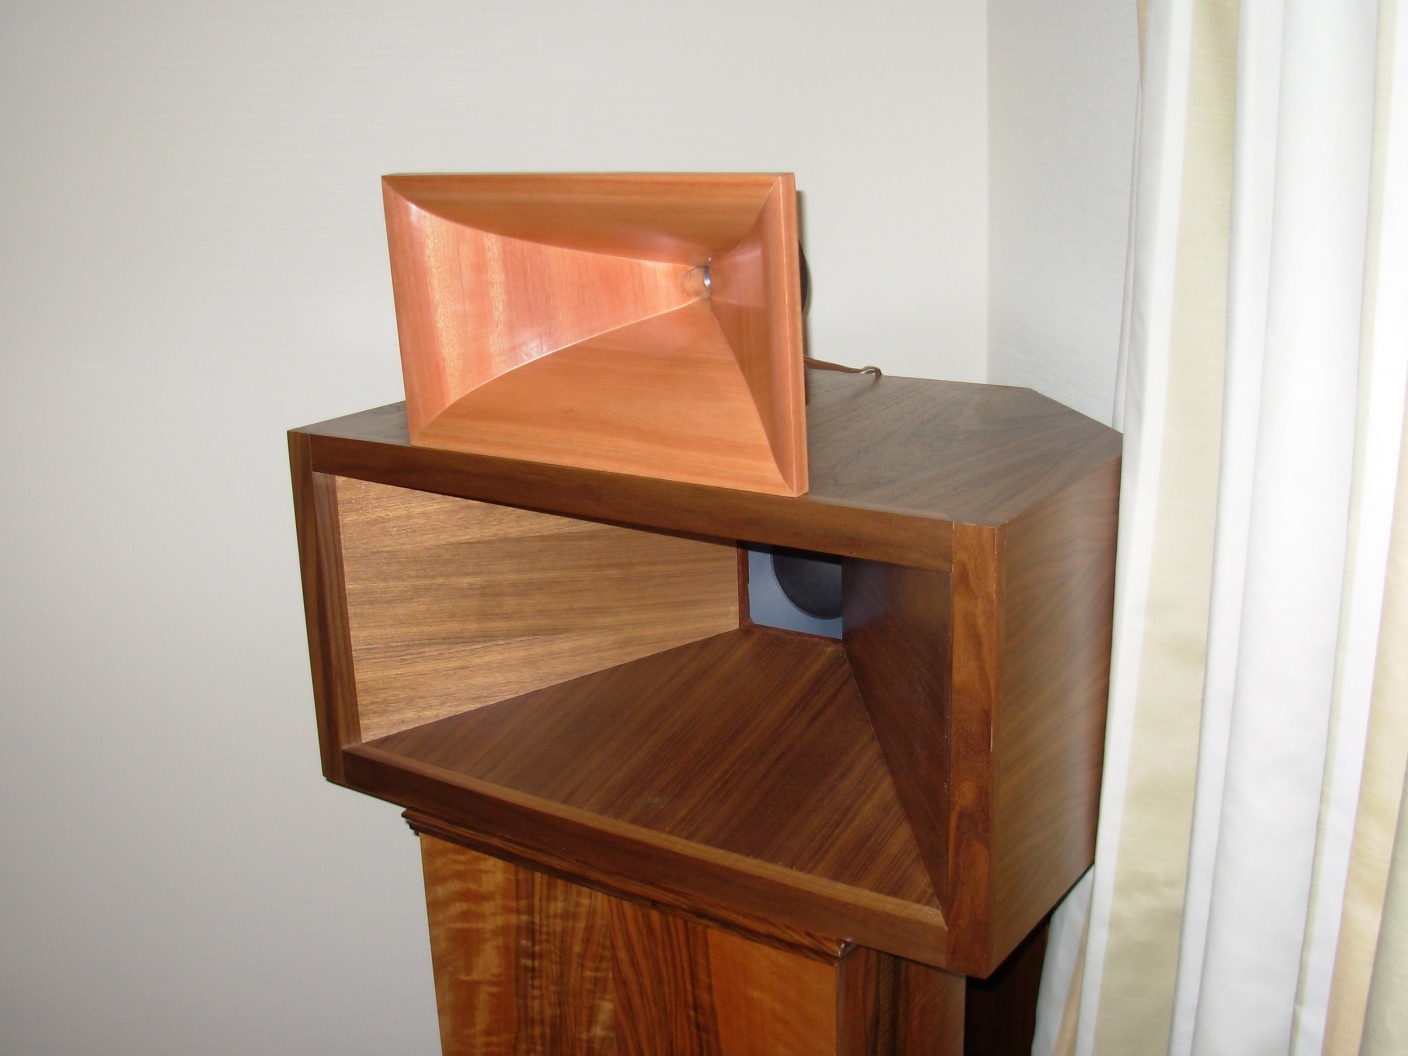
Controlled directivity is accomplished by careful choice of flare shape. The horn provides nearly perfect constant directivity across a 90° horizontal arc through the entire range of the device. This mates very well with the seven π cornerhorn design, with its 90° midhorn and its bass bin set into a trihedral corner. Each of these provides a radiating angle of 90°, which covers the listening area and does so with a uniform pattern. This ensures a uniform reverberant field and is very natural sounding, since all frequencies are present in equal proportions throughout the room. It also greatly reduces early reflections off the walls, since each subsystem radiates into a 90° within the boundaries set by the walls.
Attention was also paid to behavior in the vertical plane. Collapsing directivity is preferred with movement in the vertical arc. This provides two things: Firstly, it provides some acoustic EQ to bring up the top octave and reduce the requirement for electrical EQ. Only so much can be done with a passive EQ. Secondly, there is little use for energy far off-axis in the vertical plane since it only serves to generate floor and ceiling reflections. So directivity control in the vertical plane is established gradually and the narrowing beam serves to reduce high frequency "splash" from the floor and ceiling.
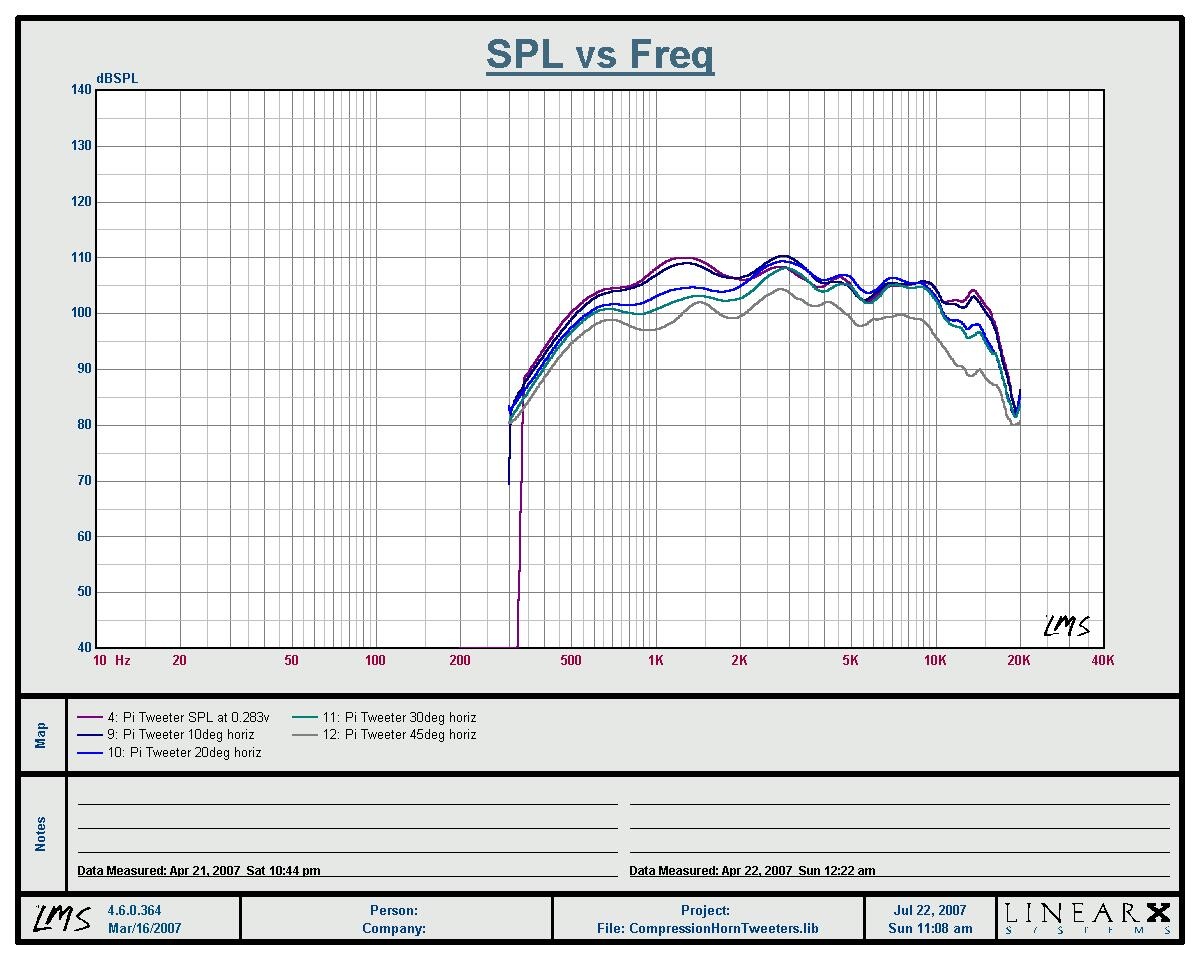 Horizontal Off-Axis Response | 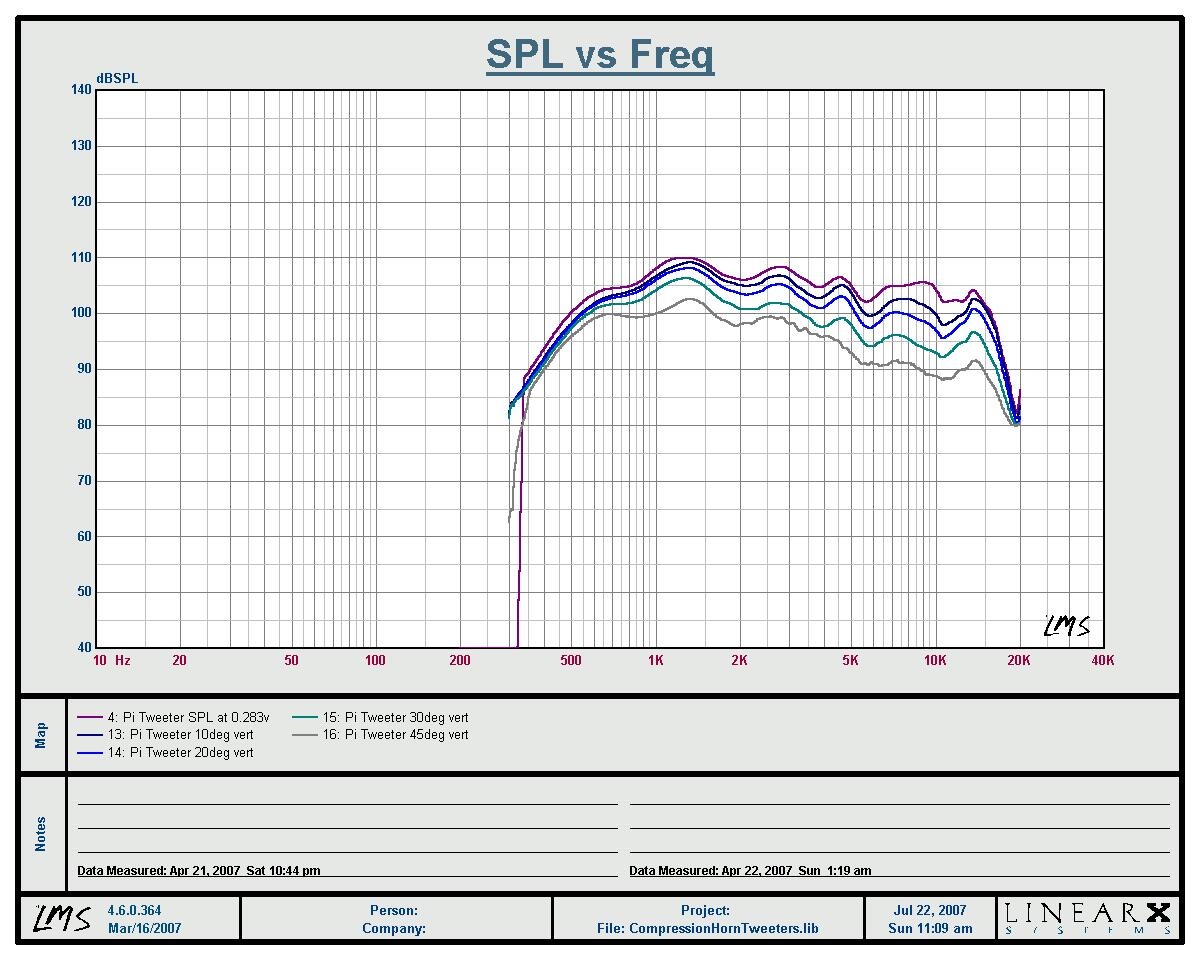 Vertical Off-Axis Response |
One way of looking at the directivity is using SPL measurements taken at various angles. The charts above show response of the horn on-axis, and at 10°, 20°, 30° and 45° off-axis.
Notice that response is virtually the same when measured off-axis in the horizontal plane. It is slightly lower in amplitude, but the overall curve is almost the same. This means the tonal balance is very similar no matter where the listener is along the horizontal arc.
Measurements taken along a vertical arc show the device has steadily decreasing energy at high frequencies with movement away from the axis. The reduction in HF is uniform, both with movement and with respect to frequency. The slope of the overall response curve shifts, but there are no abrupt changes in directivity nor are there rapid decreases in amplitude. Response at higher frequencies just falls off faster as the off-axis angle is increased. This gives a balanced sound that is very natural, even to off-axis sounds that will contribute to the reverberant field.
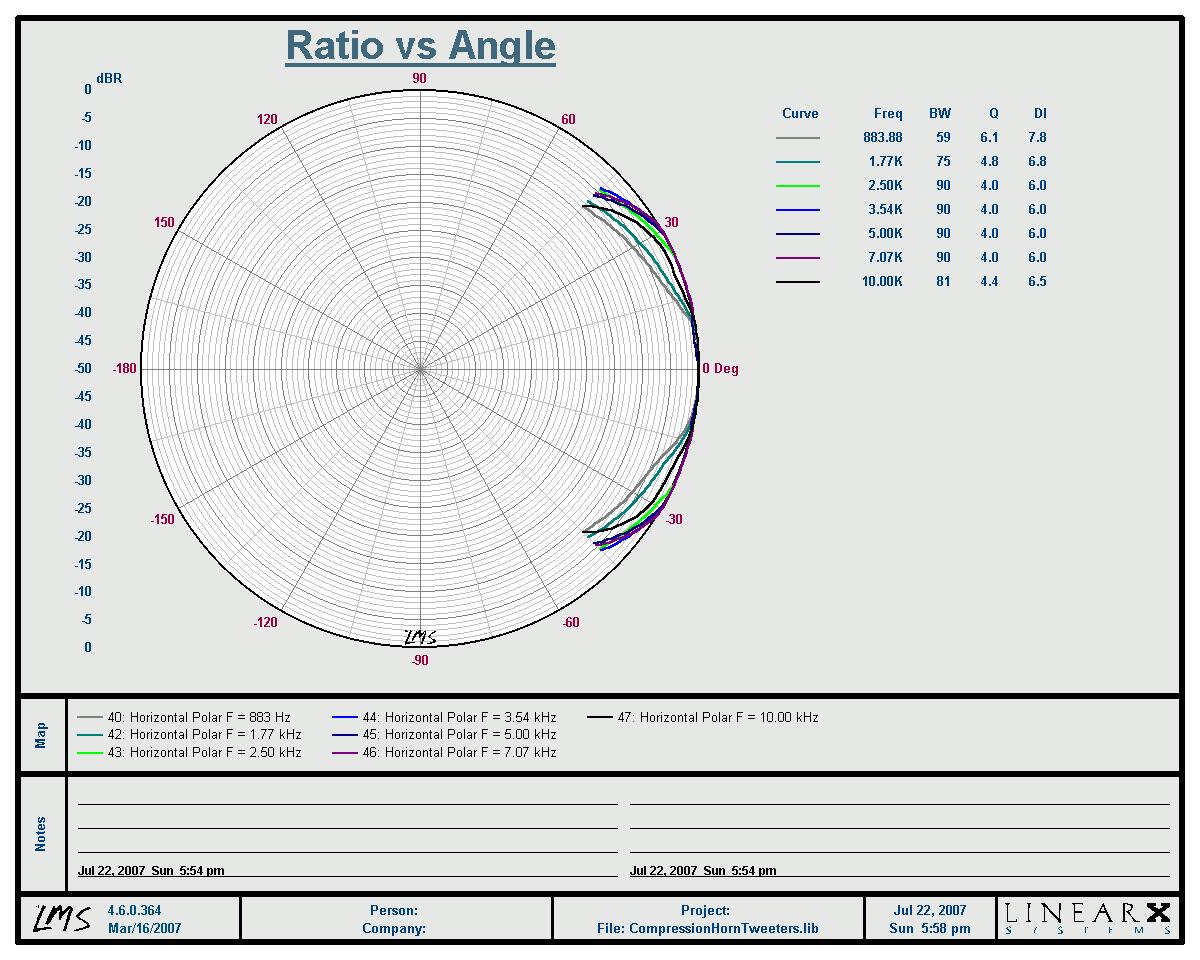 Horizontal Polar Plot | 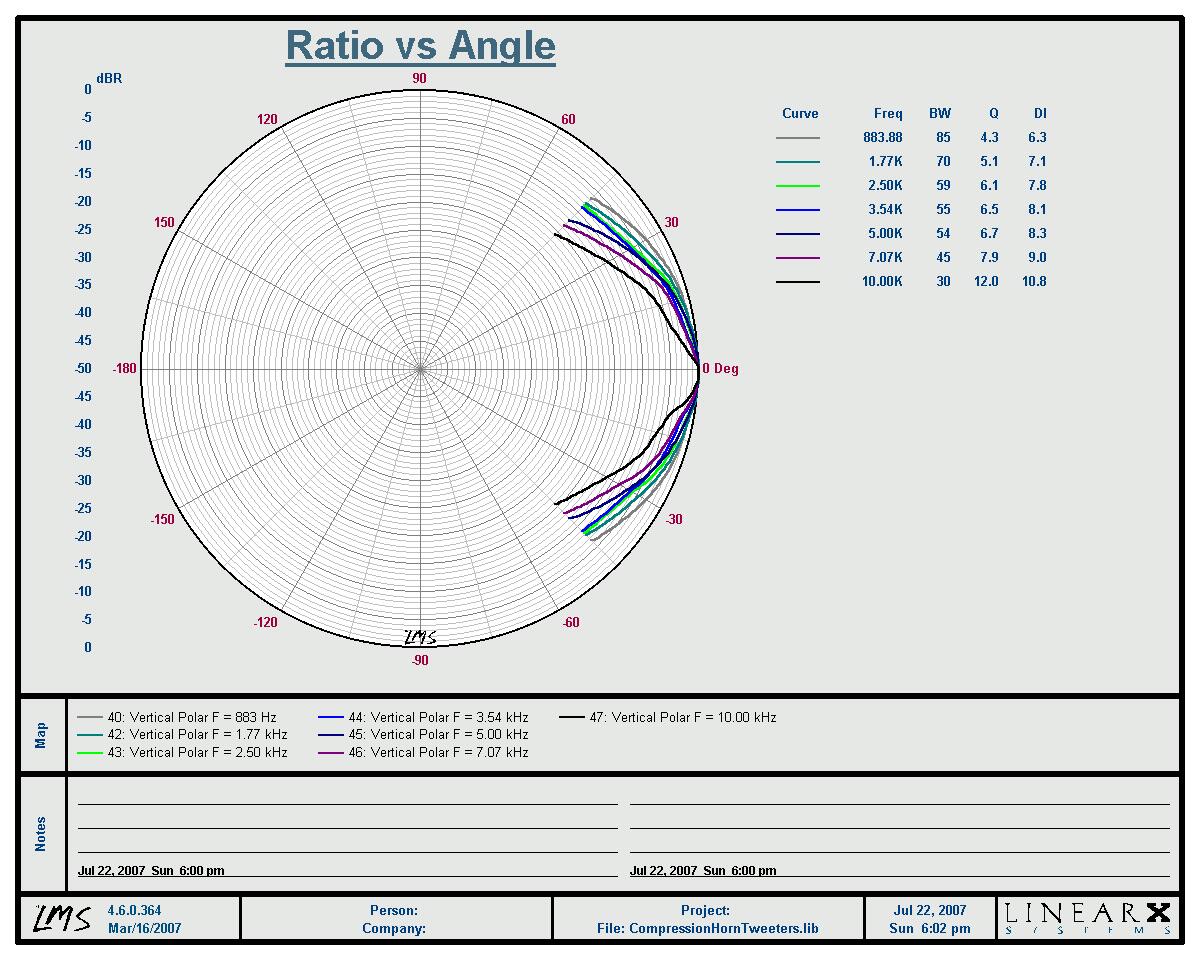 Vertical Polar Plot |
Another way of looking at directivity is with a polar plot. We can take the response curves measured on-axis and at 10°, 20°, 30° and 45° and rearrange them to show the amplitude of a few sample frequencies at various angular positions. This gives another way of viewing the same data.
You'll notice the horizontal polar plots are all nearly equal intensity, even far off-axis. The vertical plots become more "bulged" at the center (on-axis) at higher frequencies. Also pay attention to the beamwidth, Q and DI figures calculated for each frequency. These values are nearly the same for most of the frequencies in the horizontal plot but beamwidth steadily decreases (so DI and Q steadily increase) in the vertical plot.
Notice that beamwidth narrows at low frequency on the horizontal polar plot. This can also be seen in the horizontal off-axis response curves. From about 2kHz upwards, the response is almost the same to 10kHz or so, where it begins to fall off. The reason for the narrowing of beamwidth below 2kHz is that the side walls are straight. Low frequency beaming is common for a CD horn of this type. Widening the exit angle of the mouth would compensate for this, as would mouth extensions or placement in a corner. Since these horns were designed primarily for use with a 1.6kHz crossover point, this was not a concern. From the crossover point up to the top octave, directivity is constant at 90°. It only narrows slightly to 80° as it enters the top octave.
The π Speakers 90° wood tweeter is a no-compromise horn. Frankly, it can only be made at a no-compromise price.
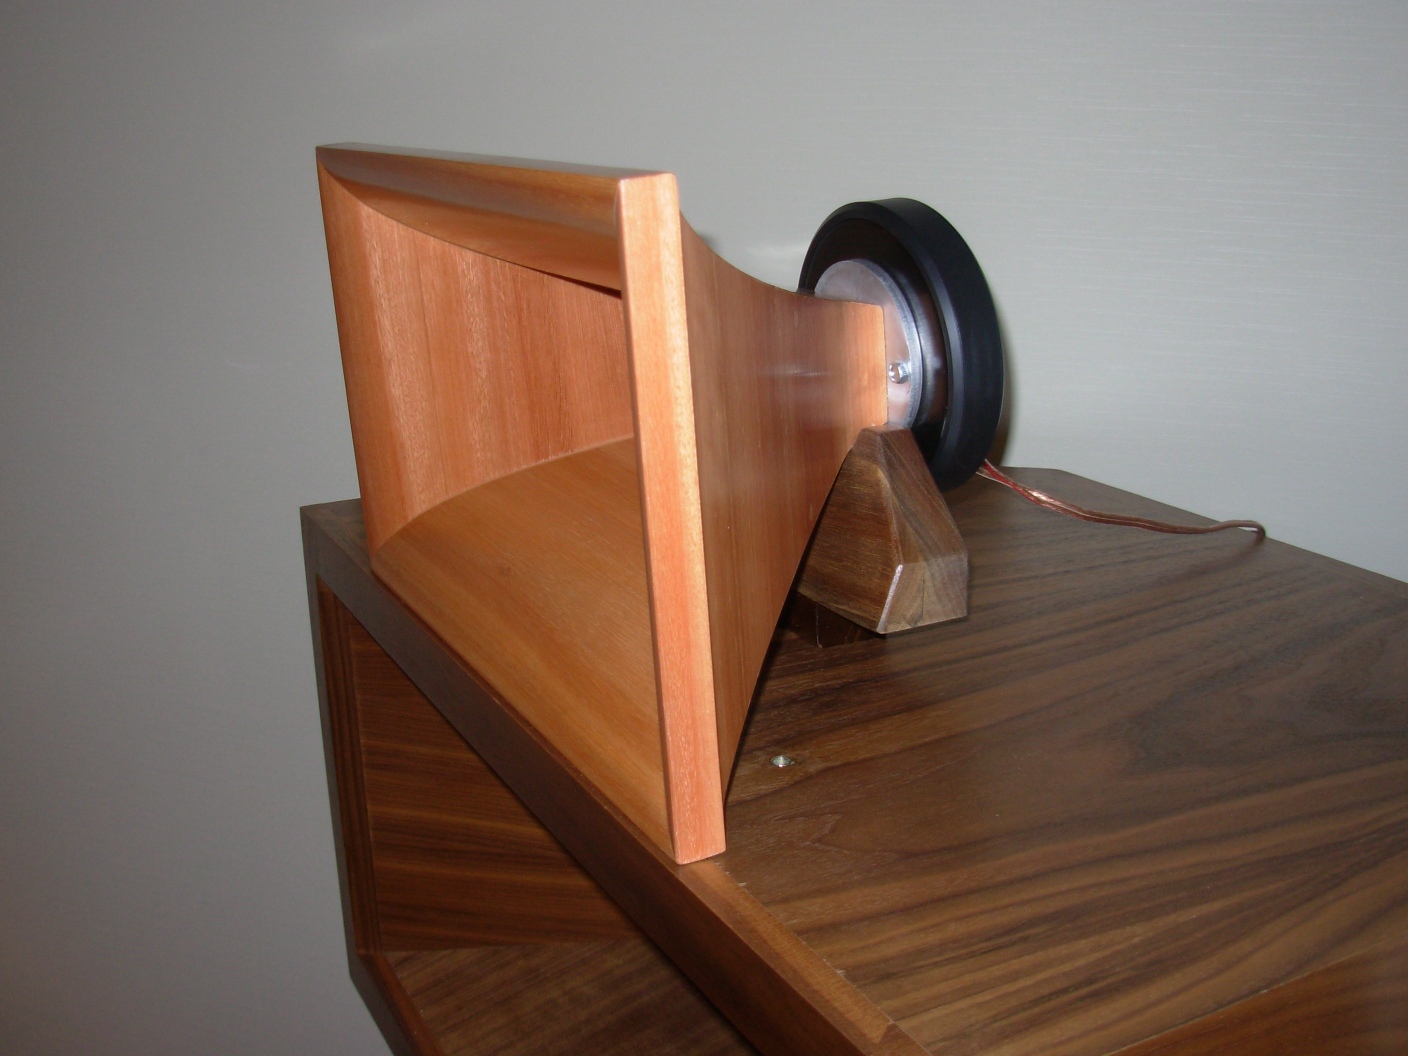
The throat plate is machined from 6061 aluminum plate and is 1/4" thick. This is thick enough to be durable but thin enough that most of the horn is wood. I didn't want to use a wood mounting plate because repeated installation and de-installation of drivers can wear out a wooden plate, but I didn't want an excessively long metal throat either. So a 1/4" plate was chosen, one that uses an O-Ring seal for the compression driver.
The flare is made using four pieces of solid wood stock, approximately 10 board feet. It is machined on a Thermwood C40 CNC table and takes about 4 hours of machine time. Each flare panel is made using hundreds of closely-spaced passes of the cutting head to achieve the smoothly-curved shape. But even with this precision, assembly is not a trivial matter. Each piece is lightly sanded to be perfectly smooth, and the joints are fitted together. Then the desired finish is applied.
This is an expensive process because it requires a lot of machine time as well as manual fit and finish work. One might think the CNC machinery would lessen the labor costs, and it does. But the truth is the CNC machine makes this kind of horn possible. If we didn't have this kind of machine accuracy, we couldn't make a horn like this at all. Even with it, there is a lot of work involved.
One of my driving goals was cost. I wanted to hit a $400.00-500.00 target, but that would have required sacrifices that made this quality impossible. We could have made a simpler horn to hit the target cost, but it wouldn't have the directivity that I wanted and wouldn't be nearly as attractive. What we've done is to make a wood horn that costs no more than similar wood horns, but that outperforms them acoustically and is visually stunning too. This horn is a work of art.
We can make these horns with any wood you like, but it has to be 2" thick. A pair is cut from a piece of wood, 8ft long, 15" wide and 2" thick. The price is set for 2" (8/4) wood that cost $2.00 per board foot. That's about $40.00 wood cost. Exotic wood naturally costs more, but the beauty of the shape of these horns lends itself to artistic expression. I just bought some quilted AAA maple for a pair of these horns at $33.00 per board foot. I spent $700.00 just for the material alone, which adds about $300.00 to the cost of each horn. But they're worth it.
[ PiSpeakers Forum ] [ Help ]